Why I built this
A note from the maker
I made this program for photographers, because I am one myself. By day I run a robotics start-up — I'm an inventor, a husband, and a father of three girls. And in my free time, or in my time with my girls, I'm a photographer.
I've been doing photography since I was thirteen, and I've lived through every change the photography world has thrown at us since. I used to shoot architecture; my real passion was bird photography — chasing rare species in Brazil. Back then, every keeper was hard-won. But cameras kept getting faster and better, and somewhere along the way I got spoiled: these days I rarely miss a shot. Shooting at ten frames a second or more in RAW, though, creates a new problem — too many photos to go through.
For years that was manageable. I'd come home with a few hundred frames, cull them in Lightroom Classic, perfect the RAW settings, do the occasional edit. Then came one particular stretch: I shot a local basketball team. I shot a show. The next day was my baby girl's ten-month birthday, so I photographed her — and then we were off to the park with friends. Between my two cameras and several battery changes, I was averaging over two thousand pictures per session. When I finally sat down at my workstation, I was staring at roughly fifteen thousand photos.
I was tired. I wanted to go to bed, and instead I was grinding through thumbnails. And Lightroom simply isn't built for this — too many options, and all that visual rendering makes it heavy; with that many photos it crashes even on a serious machine.
My wife watched me spending hours at it and said: “Why don't you just make a program to do that for you?”
She was right. If I invested a little time building my own tool — suited to my taste, my style, my needs — then everything afterward would be a breeze. The goal was simple: point the software at the folder from the memory card, choose where the results should go, and let it do the rest. Nothing else to decide.
Thanks to the amazing programming and debugging tools available today, my first working version was done in two weeks. And because I had over a hundred thousand photos taken across the years, I could tune the program's internal logic against my own history — my original RAW files on one side, the edits I had made one by one on the other. The automation isn't perfect, but it comes remarkably close to the methods I've learned over a lifetime of shooting — except now it's all automatic. Set-and-forget batch processing: culling, converting camera RAW to DNG, and then, if you want, batch-editing everything.
One decision mattered more than any other: everything runs locally, with algorithmic solutions on your own PC — not an online AI editor. Uploading thousands of large RAW files to the cloud and waiting for a service to hand them back simply isn't practical. Your photos stay on your machine, and the machine does the work.
Today, those fifteen thousand photos are done in under an hour instead of days and days. The output lands automatically in two folders: high-resolution 300-DPI JPGs ready for printing or developing, and web-sized versions for sharing — all from a simple folder selection, nothing else. I still open Lightroom here and there for a key edit on a special frame — but I do it on the keepers my program has already found.
I hope this program helps others who face the same problem I did. If you run into issues, or you see ways I can make it better, let me know.
Enjoy RAW Keepers — I hope it helps you as much as it helps me.
— Cheers, Danny D.
What's inside
Why I built this — a note from Danny
1. Welcome — what RAW Keepers is
2. The big idea: cull first, edit second
3. Finding the keepers (the cull)
4. Getting photos level — trusting the camera's own sensor
5. HDR without the ghosts
6. Editing that respects the photo
7. The shooting modes: Sports, Concert, Bird, Product
8. AI Denoise — cleaning grain the modern way
9. The camera-back screen
10. Built-in safety and honesty
11. Speaking every camera's RAW language
12. How it all gets tested
13. A few numbers tech people will enjoy
14. Plain-English glossary
1 · Welcome — what RAW Keepers is
Come home from a shoot with 3,000 photos, and the real work hasn't started yet. Somebody has to look at every frame, throw away the misses, pick the best of each moment, and then edit the survivors. Professionals call that first pass “culling,” and it can eat an entire evening.
RAW Keepers is a Windows app that does that first pass for you. It reads the RAW files straight off your memory card, finds the frames worth keeping, and can then edit those keepers into finished, natural-looking photos — automatically, on your own computer.
Two promises shape everything in this manual:
- Your originals are sacred — the app never modifies or deletes a RAW file. It only ever works on copies. Ever.
- Everything happens on your PC — no photo is uploaded anywhere. There is no cloud, no account, no subscription needed to cull. Your photos never leave your machine.
Cloud services can be faster to build and easier to monetize — but they mean uploading gigabytes after every shoot, monthly fees, and trusting a stranger's server with unreleased client work. A wedding photographer's card is full of other people's private moments.
Local-first was harder to engineer (the AI has to run on whatever PC you own), but it means the app works on an airplane, costs nothing per photo, and privacy isn't a policy — it's physics.
2 · The big idea: cull first, edit second
The app has two buttons that matter: CULL and EDIT. They mirror how working photographers actually operate — first choose, then polish. You can run them separately or back-to-back.
- CULL · Find the Keepers — scans the whole folder, groups shots of the same moment, and keeps the best of each — sharp, well-exposed, eyes open and in focus.
- EDIT · Finish them — takes the keepers and produces two ready-to-use versions of each: a full-resolution print file and a phone-friendly copy.
Between those two steps sits a simple rule that guides the whole design: the app should behave like a careful darkroom assistant, not an over-eager intern. If a photo is already good, it is left almost completely alone.
The engine is Python + OpenCV, with the UI rendered as a camera-back styled HTML panel in a native window (pywebview). Heavy lifting — RAW decode, face detection, HDR merging, deep denoising — runs in the Python process; the interface only receives tiny progress events and 220-pixel thumbnails, so the display never slows the processing.
The cull analyses embedded preview JPEGs rather than full RAW demosaics — 10-20x faster, and every focus/exposure decision the cull makes is valid on the preview because it's the camera's own rendering of the same frame.
3 · Finding the keepers (the cull)
The cull answers three questions about every frame: Is it technically good? Is it a duplicate of a better shot? And if people are in it — do they look good? Each question has its own method, and each method earned its place by being tested against real shoots.
Sharp or soft?
The app measures how much fine detail a frame actually contains — crisp edges score high, motion blur and missed focus score low. But rather than using one fixed pass/fail line for every photo, the bar adapts to each shoot: an evening indoor set is judged against evening indoor sharpness, not against a sunny-day standard.
Sharpness is Tenengrad energy — the sum of squared Sobel gradients — measured on a normalized downscale of each preview. The reject floor is relative (a fraction of the shoot's median sharpness) with an absolute minimum, so one lens's rendering or one venue's light doesn't cause mass false rejections.
One moment, one keeper
Ten frames of the same pose don't deserve ten keepers. The app groups photos that show the same scene, then keeps the best from each group. The interesting part is how it decides two photos are “the same scene”: it looks at the background, not the people.
The first version fingerprinted the WHOLE frame — and failed in testing: the same family in front of the same fountain counted as “different scenes” every time someone moved an arm. Grouping by low-resolution background signature fixed it: people move, backgrounds don't.
The alternative — AI scene classification — was tried and rejected: slower, heavier, and it grouped by what things ARE (“beach”) rather than where the camera was standing, which is what a photographer means by “same shot.”
The cull-amount knob — how picky should it be?
How many keepers is the right number? That depends on the photographer and the day - a wedding second-shooter wants one best frame per moment; a parent may want every good smile. So the strictness is a physical-feeling KNOB on the right side of the app, with five positions:
- 1 best / scene — the strictest. One winner per moment, period. Best for huge event shoots you need to deliver fast.
- fewer — strict, but a scene with two genuinely different expressions may keep both.
- balanced — the default. Keeps the best of each moment plus meaningfully different variations.
- more — lenient - keeps most distinct frames, dropping only clear duplicates and technical misses.
- keep most — the safety net. Only obvious rejects (blur, blinks, bad exposure) are removed. You do the final choosing.
The picture below makes it concrete: the SAME ten frames from a real family shoot, culled five times - once at each knob position. Green border = kept; dimmed with an X = removed. Watch the keepers grow from 2 to 7 as the knob turns from strict to lenient - and notice the sharpest, best-expression frames survive at EVERY setting.
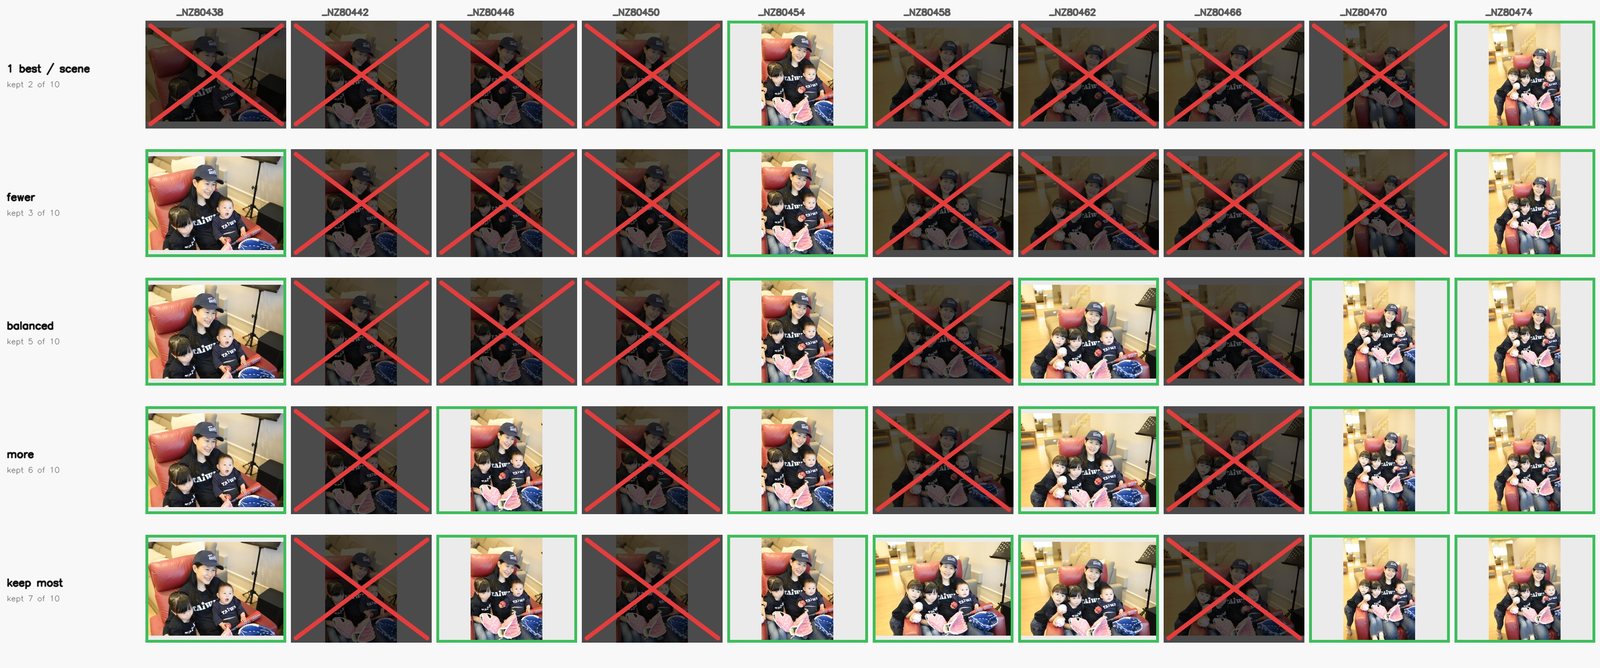
Why a five-position knob instead of a free number (“keep 37%”)? Because percentages mean nothing at the card level - the right answer depends on how repetitive the shoot was. The five positions are photographic INTENTS (deliver one winner / give me options / just clear the junk), each mapped to tuned grouping thresholds that were validated on real shoots. Fewer choices, each one meaningful - like shutter priority instead of a physics exam.
The eyes rule
For photos of people, one thing decides keep-or-toss more than anything else: are the eyes sharp? A technically perfect frame with soft eyes is a reject; a slightly softer frame where the eyes are crisp is the keeper. The app finds each face, locates the eye line, and measures focus exactly there. It also prefers open eyes and flattering expressions when choosing among near-duplicates.
Faces come from YuNet (a compact, fast face detector that runs well on CPU); the eye-line focus measurement is Tenengrad sampled in a band across the detected eye landmarks. The keeper gate requires eye-focus of at least 45% of the shoot's best - relative again, so a soft-lens shoot isn't wiped out.
4 · Getting photos level — trusting the camera's own sensor
A crooked horizon is the fastest way to make a photo feel amateur. Most software fixes tilt by analyzing the image — looking for lines that ought to be horizontal. RAW Keepers does something more direct: it asks the camera.
Modern cameras contain the same tilt sensor your phone uses to rotate the screen. At the instant you press the shutter, the camera records exactly how many degrees it was rotated — and writes it invisibly into the photo file. RAW Keepers reads that number and levels the photo by precisely that amount.
This choice was settled by a family photo. Image-analysis methods (including an AI one) all said the photo was level; it looked level; three separate reviewers said the leveling code was wrong. The camera's sensor said it was tilted 9.2 degrees. The camera was right - the whole scene (a sloping garden) was misleading every pixel-based method at once.
Lesson learned and kept: measured ground truth beats clever estimation. Pixel analysis remains only as the fallback for older cameras that don't record tilt.
The tilt is read via exiftool as RollAngle - and it works across Nikon, Canon, Sony, Olympus, Panasonic and Pentax, because virtually every maker exposes the same field. The value is folded modulo 90° to remove portrait-grip rotation, leaving only residual roll. After rotation, the app crops to the largest inscribed rectangle - no mirrored edge padding.
5 · HDR without the ghosts
When a scene has both deep shadow and bright sky, photographers shoot exposure brackets — the same frame at several brightnesses — and merge them later. RAW Keepers finds those bracket sets on your card automatically and merges them into one balanced image.
The hard part isn't the merging. It's knowing which frames belong together, and when merging is a bad idea.
Finding the brackets
The app doesn't guess from timestamps. It reads the camera's own exposure-compensation sequence — the 0, −1, +1 pattern the camera writes while auto-bracketing — and treats a set as complete when the pattern repeats. Frames shot seconds apart still group correctly; unrelated frames shot quickly never get pulled in.
Knowing when NOT to merge
Merging goes wrong when something in the scene moves — you get a ghost, a double image. So before merging, the app checks the frames for subject movement. Quick, still sets get merged; sets where the subject moved collapse to the single best frame instead. And photos with people are never HDR-merged at all — one well-chosen frame is edited instead.
The obvious alternative — merge everything and run “deghosting” — was tested and rejected. On a child's light-up toy, deghost blending made the result worse: half-erased lights, smeared edges. The honest answer is that a moving subject doesn't want to be merged; it wants its best single frame. Skipping the merge IS the fix.
Timestamps alone were also tried for grouping and failed - the app once paired frames shot 21 seconds apart and split real sets mid-burst. The camera's own bracket bookkeeping is the only reliable signal, so that's what is used.
Bracket grouping runs as a pre-pass on the flat timeline (so no bracket frame ever leaks into the cull as a “dark reject”). Sets merge via Mertens exposure fusion on GPU when available; subject-motion fraction between frames decides merge vs collapse-to-metered-sharpest.
6 · Editing that respects the photo
Auto-editing has a bad reputation because most of it edits everything, always, the same way. RAW Keepers starts from the opposite position:
“If the original is good, don't re-tone it.”
Every photo is first checked: is it already well exposed, with real contrast and clean color? If yes, it passes through nearly untouched — leveled if needed, exported, done. The camera's color, the eye catchlights, the mood: preserved. Only photos that genuinely need help get the full treatment.
The house style
When a photo does need editing, the corrections follow a specific recipe — not a generic “auto-enhance,” but the app designer's own Lightroom formula, transplanted into code: open the shadows generously, protect the highlights, deepen the blacks slightly, add gentle vibrance with skin tones protected, and a touch of dehaze. Dark, backlit subjects get lifted; bright skies stay held; faces come out warm, never orange.
Care around people
People get extra, deliberately small, touches: a light skin smoothing that keeps texture, a gentle brightening of the eyes (they sit in brow shadow and every global lift under-reaches them), and — after any smoothing — the original eye catchlights are restored from the untouched image, because a missing sparkle reads as lifeless.
Grain control that scales
Noise reduction follows a rule of thumb photographers already know: the more you brighten, the more grain you reveal, so the more cleaning you need. The app measures how much it actually lifted each photo and cleans in proportion — base-ISO daylight shots keep every pixel of crispness, while a heavily lifted indoor shot gets real smoothing. Above ISO 800 the app also stops sharpening entirely, because sharpening grain just makes crunchy grain.
One-size-fits-all editing was never on the table - it's what makes phone filters look like phone filters. Matching a real photographer's recipe (with his before/afters as the test set) keeps the output looking like his work, only faster.
The passthrough decision came from testing too: early versions re-toned everything, and already-good photos came back subtly worse - duller catchlights, greyed pastels. The best edit for a good photo is no edit.
Order matters and is fixed: geometry (level/upright) → white balance (skin-protected) → tone (the recipe, adaptive to measured darkness/clipping) → denoise (scaled by ISO and by the measured brightness lift) → retouch → catchlight restoration from the pre-smoothing copy. WB runs before tone so casts leave the neutrals; denoise runs after tone so shadow-lift noise gets cleaned; sharpening is skipped above ISO 800.
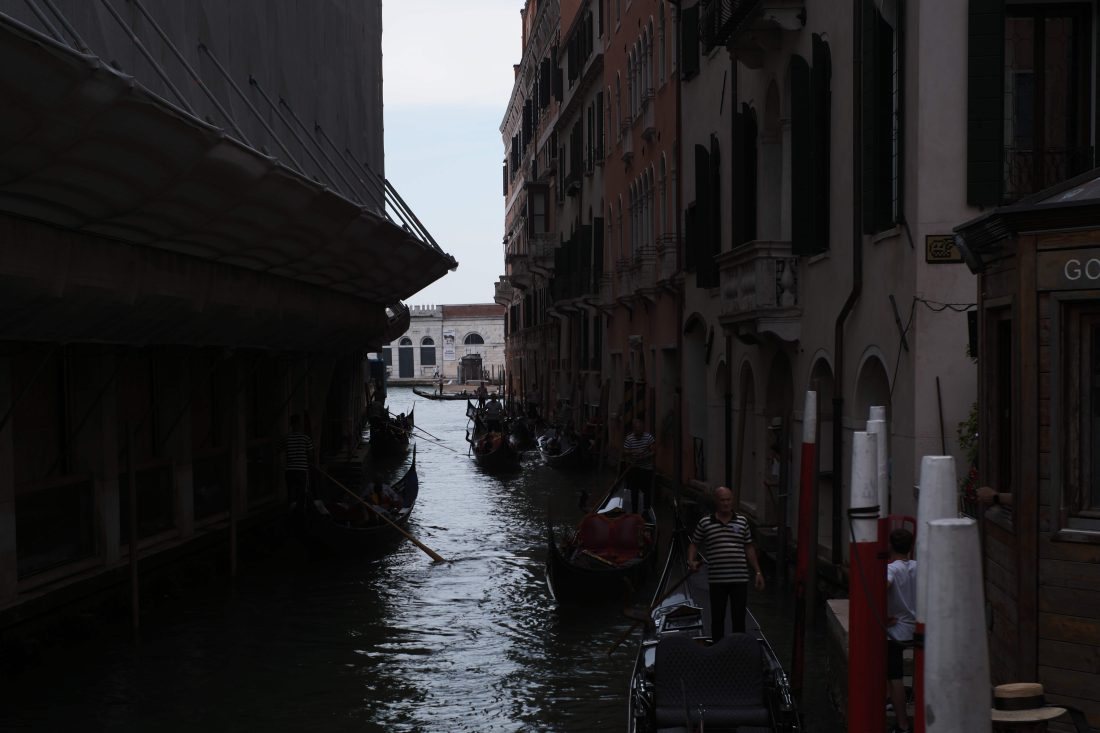
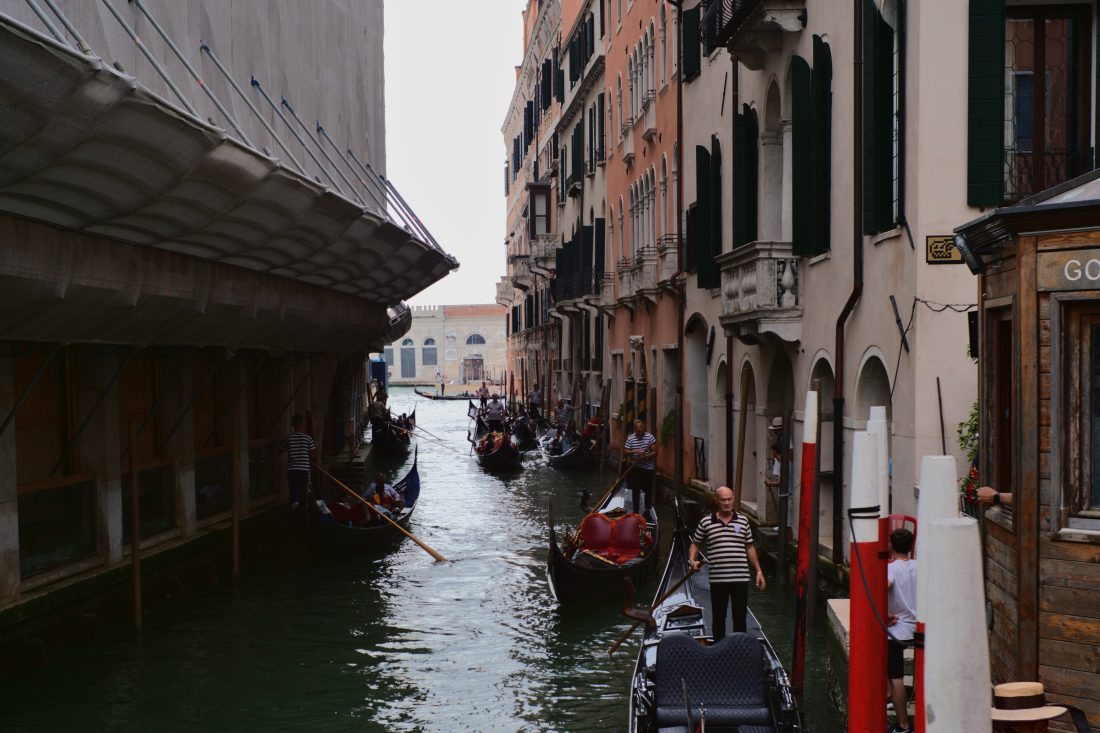
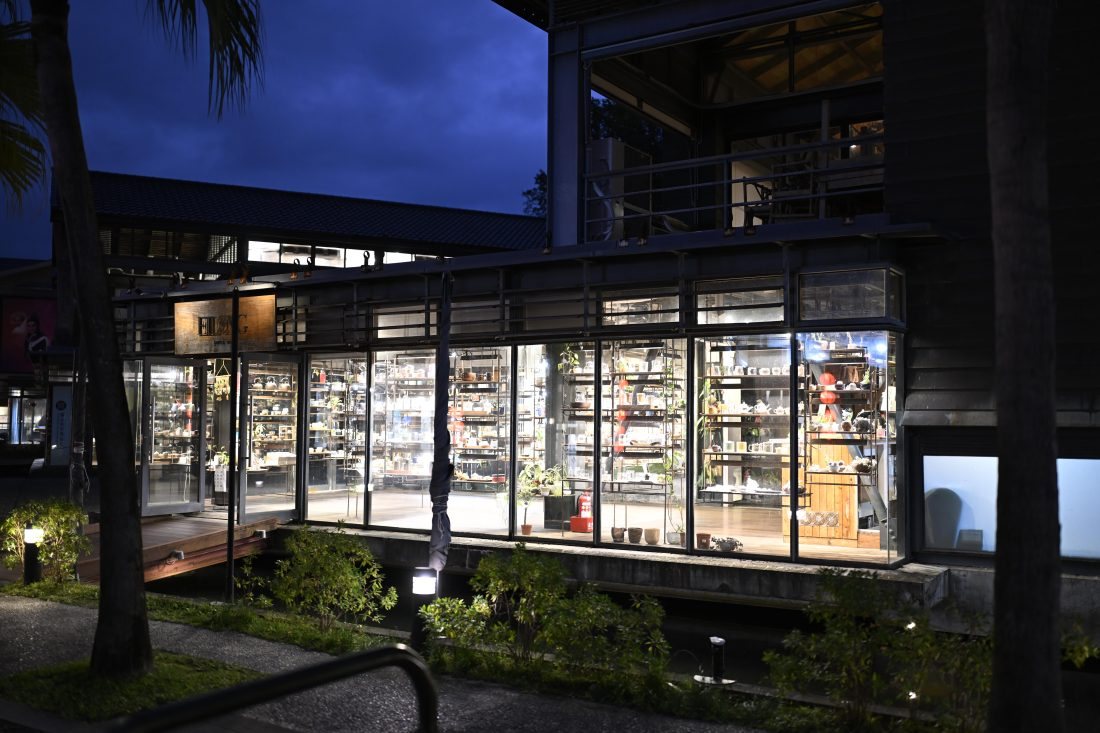
Two real edits, start to finish
Both photographs on the following pages went through the automatic edit with no human touch-ups - each shown before and after on the same page so your eye can jump between them. Notice what DIDN'T change: the mood, the color of the light, the depth of the shadows that belong dark.
7 · The shooting modes
Some kinds of photography break general rules on purpose. A concert is supposed to be dark. A basketball crowd is supposed to stay in shadow. A bird's eye must be sharp even if the whole frame is dim. For those, the app has explicit modes — switches you flip, not guesses it makes.
Auto-detection was deliberately rejected for these modes. Lighting alone cannot tell a concert from a candlelit dinner - both are dark scenes with warm point lights - and a wrong guess would ruin the dinner photo with stage treatment. A manual switch costs the user one tap and removes a whole class of wrong-mood edits. The switches are also mutually exclusive: turning one on turns the others off, so modes can't fight each other.
Sports mode
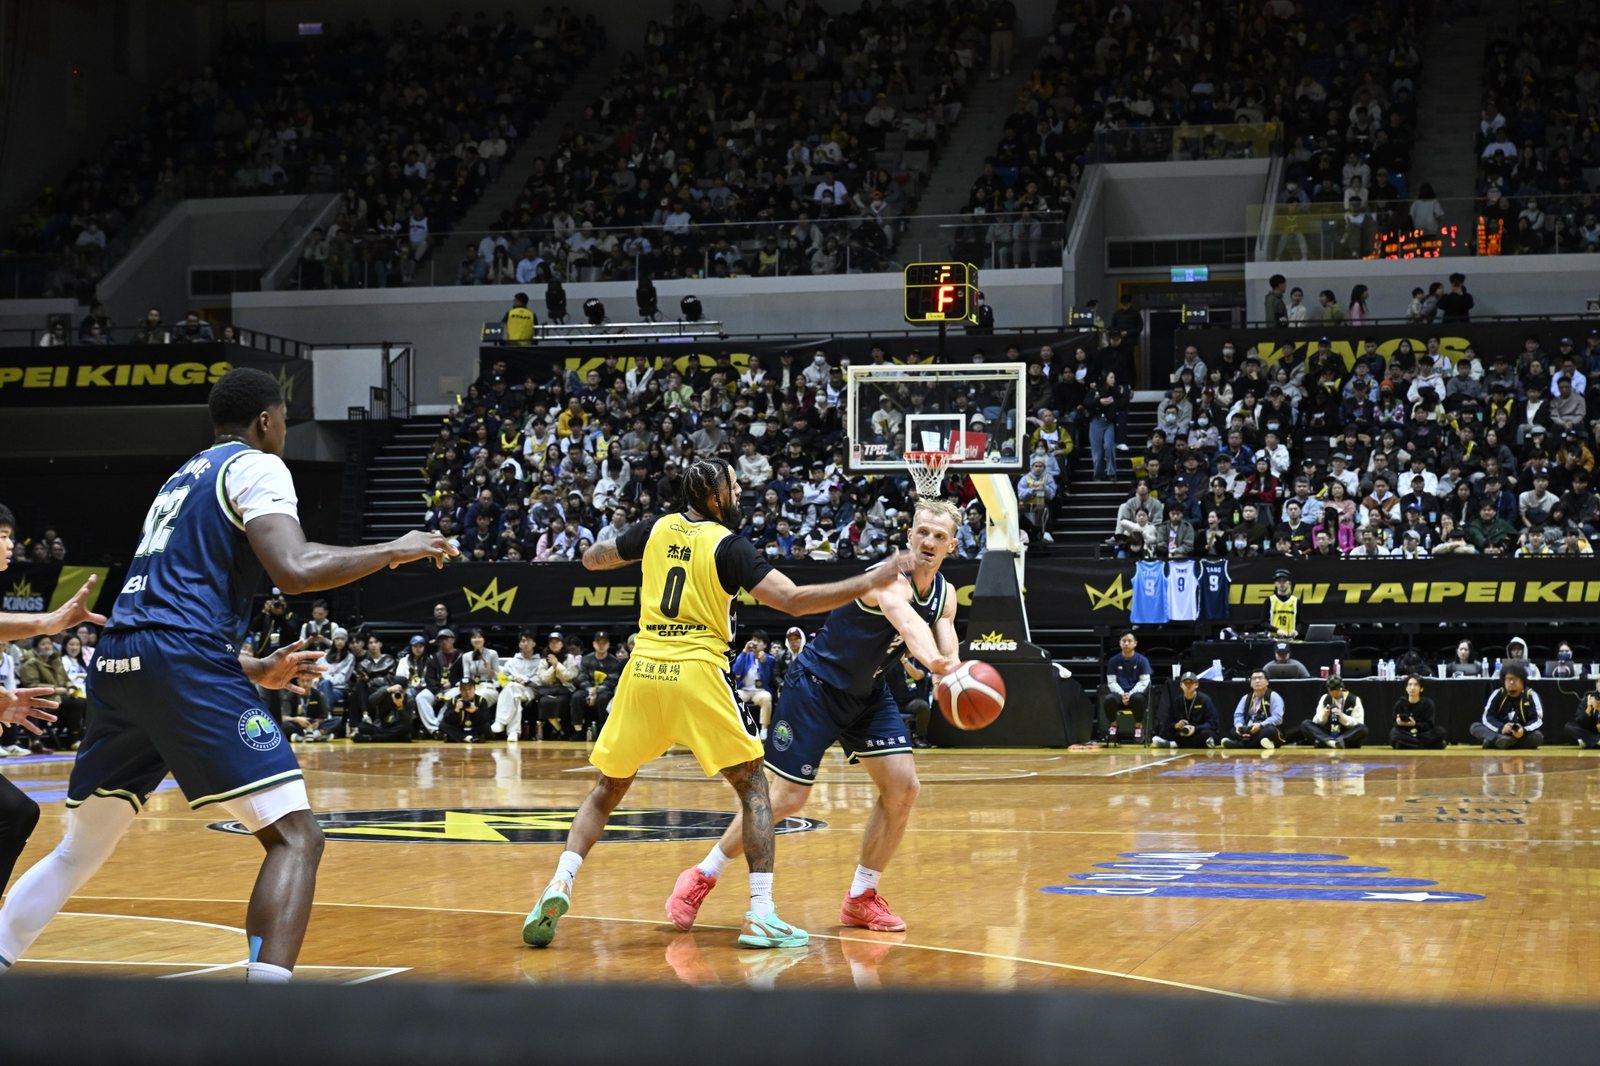
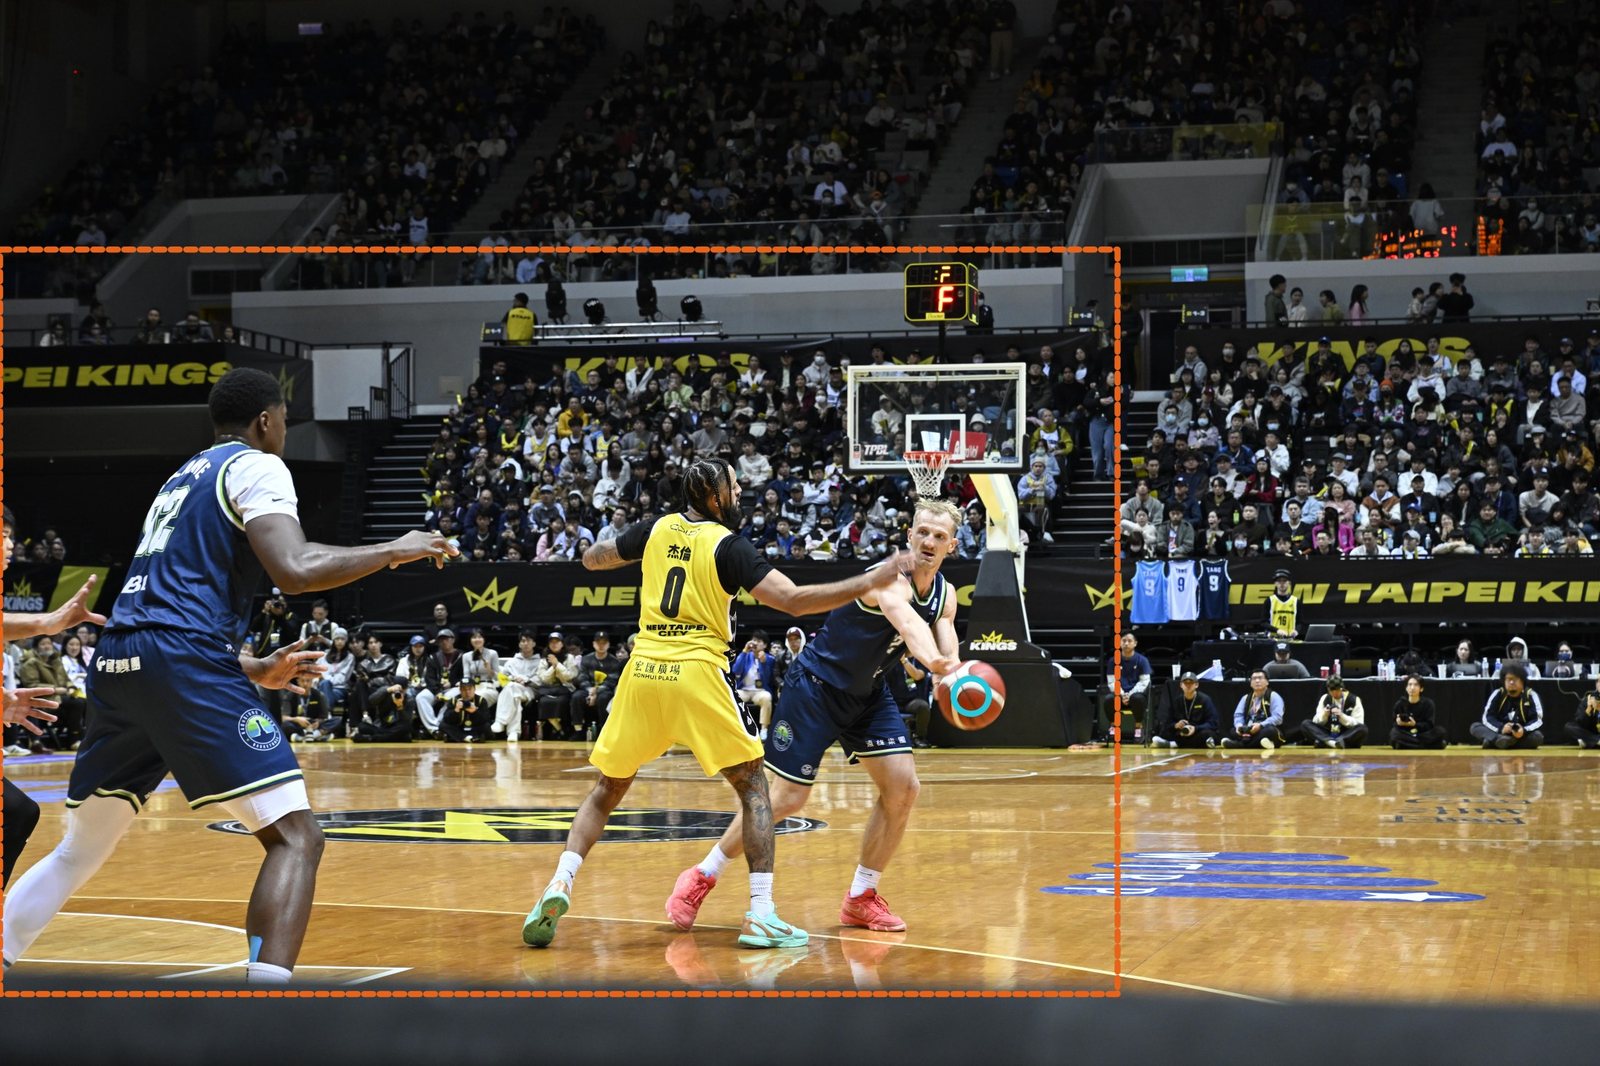
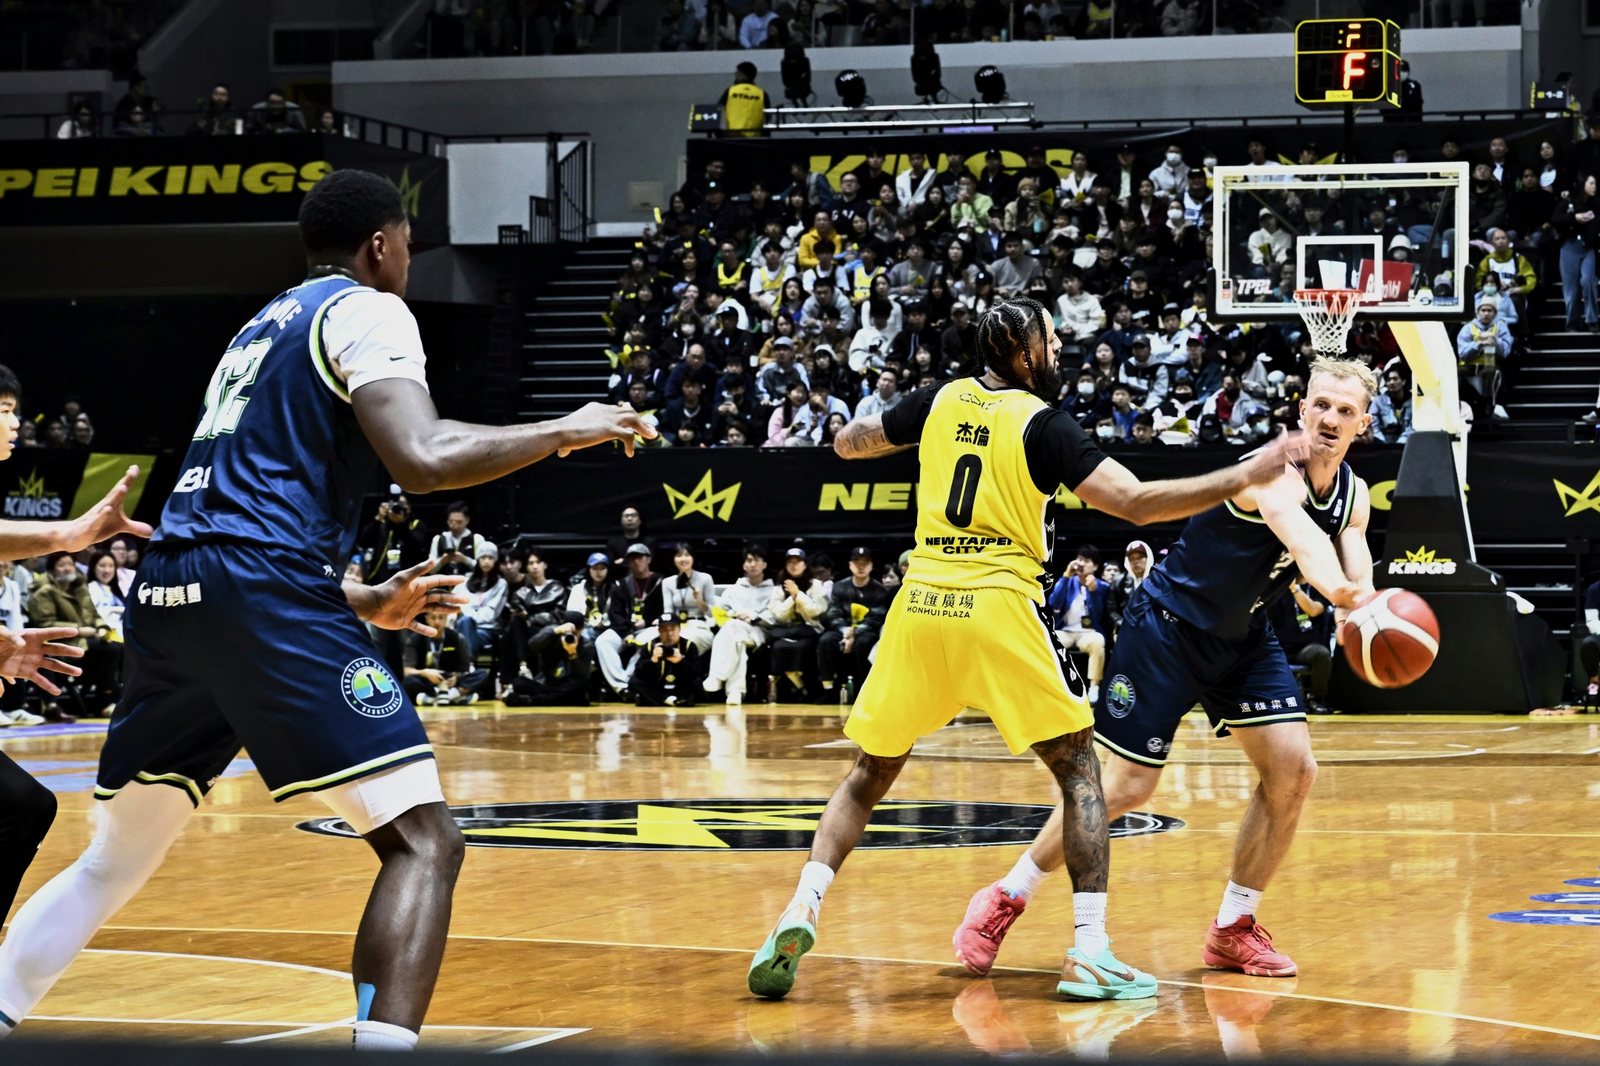
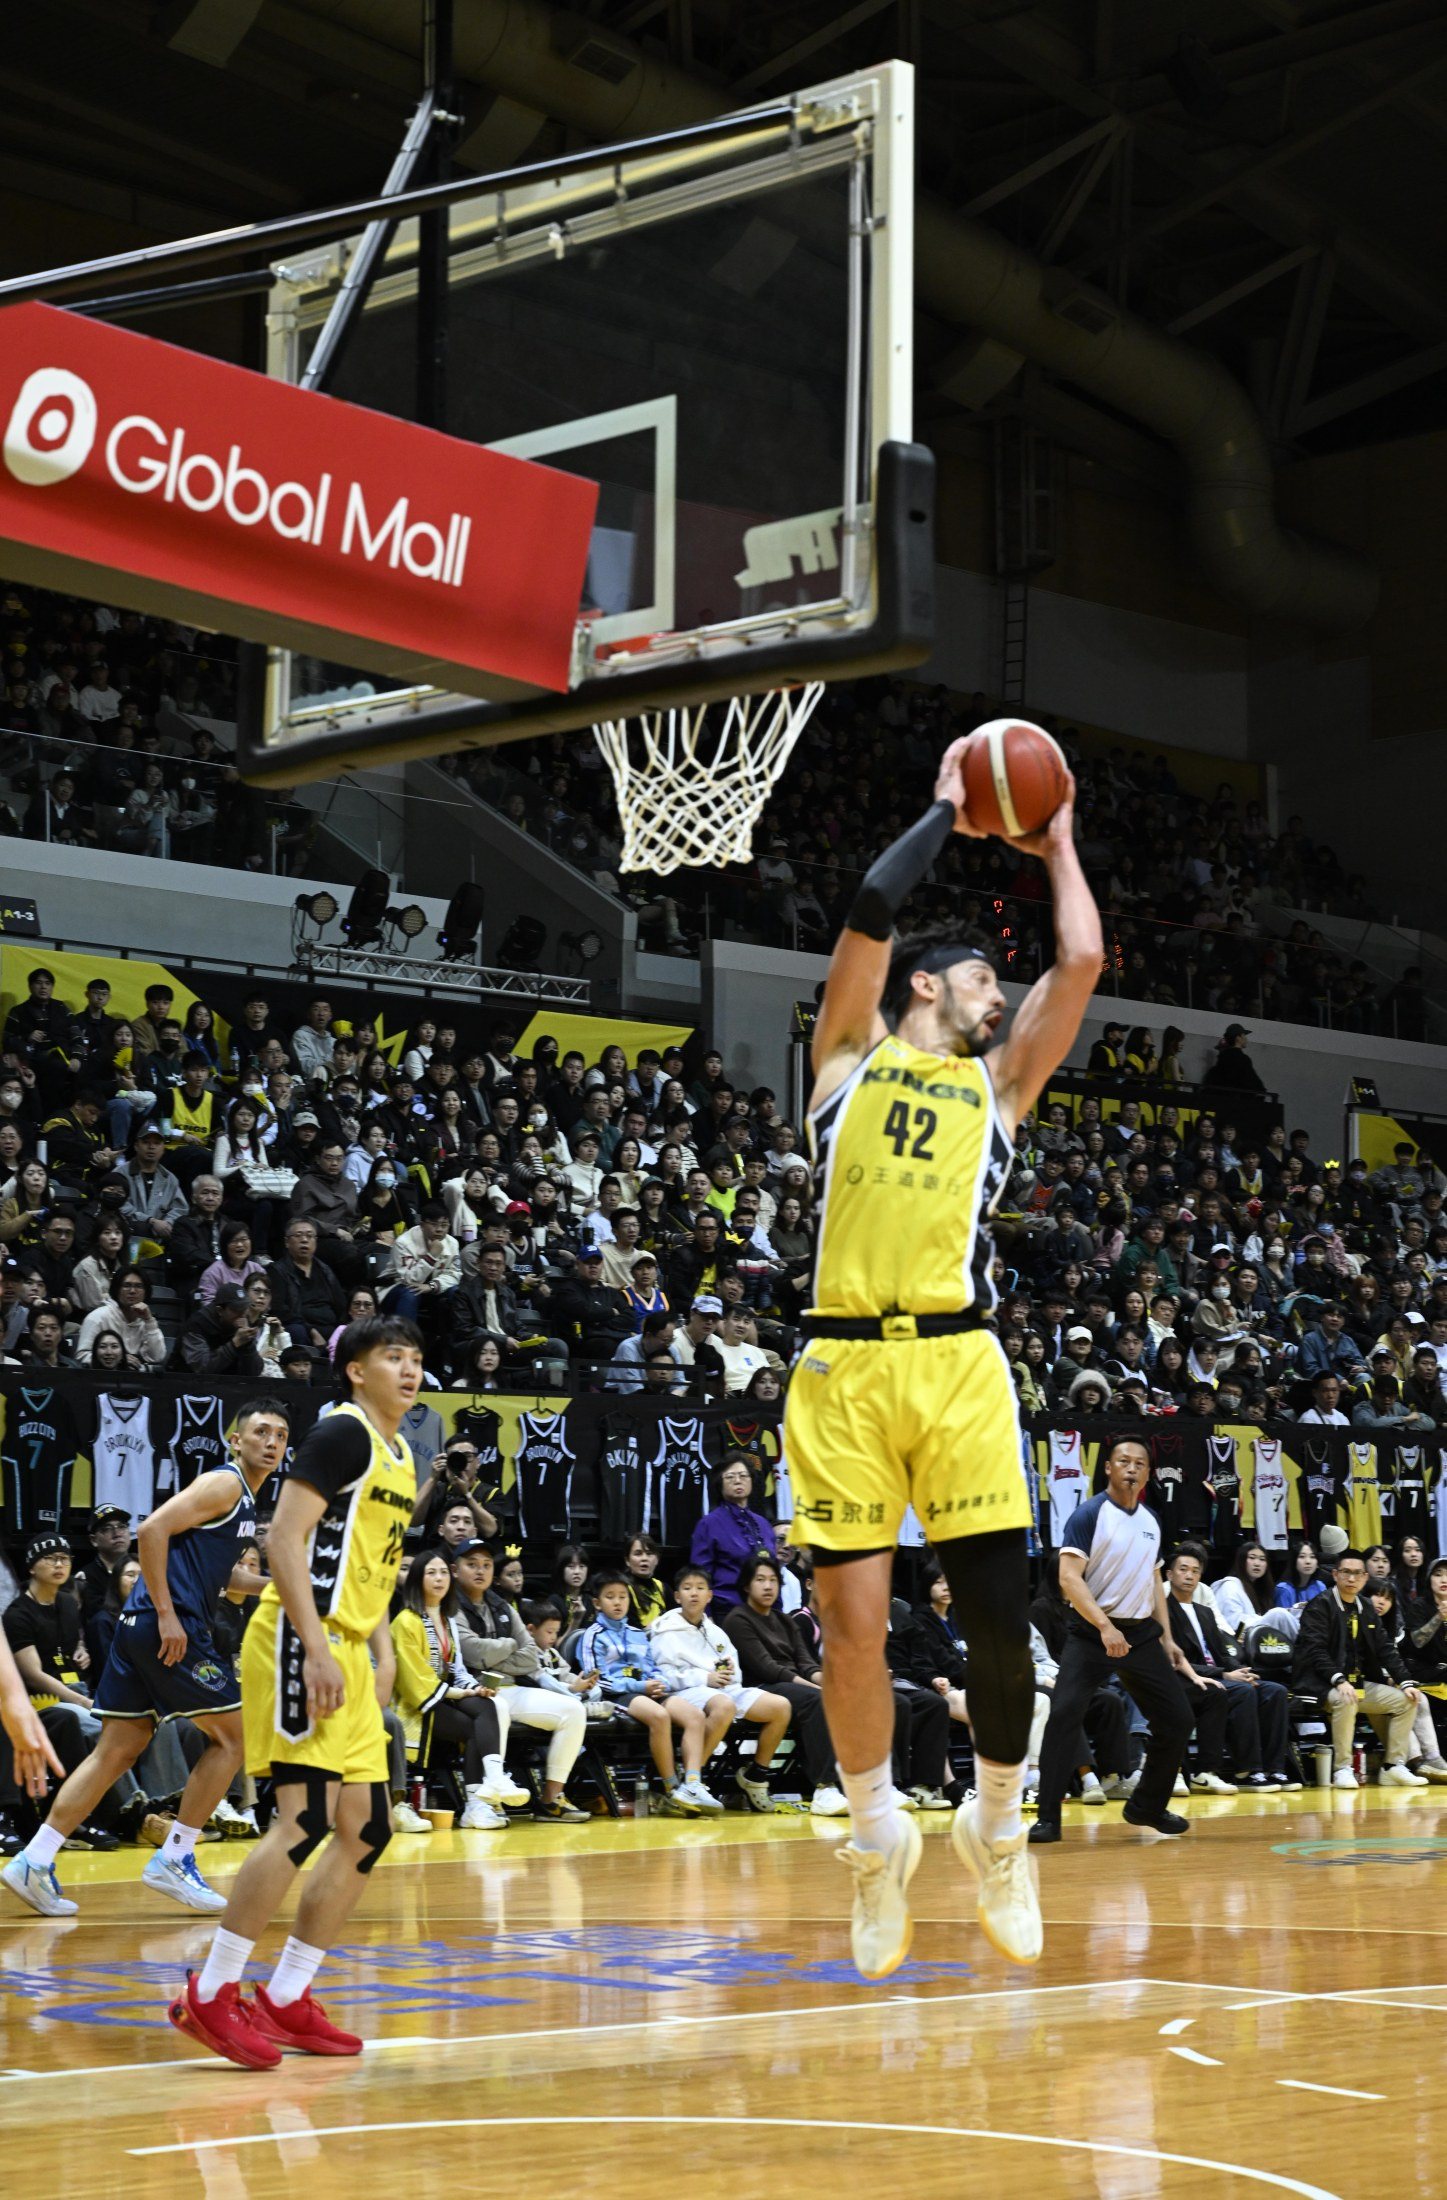
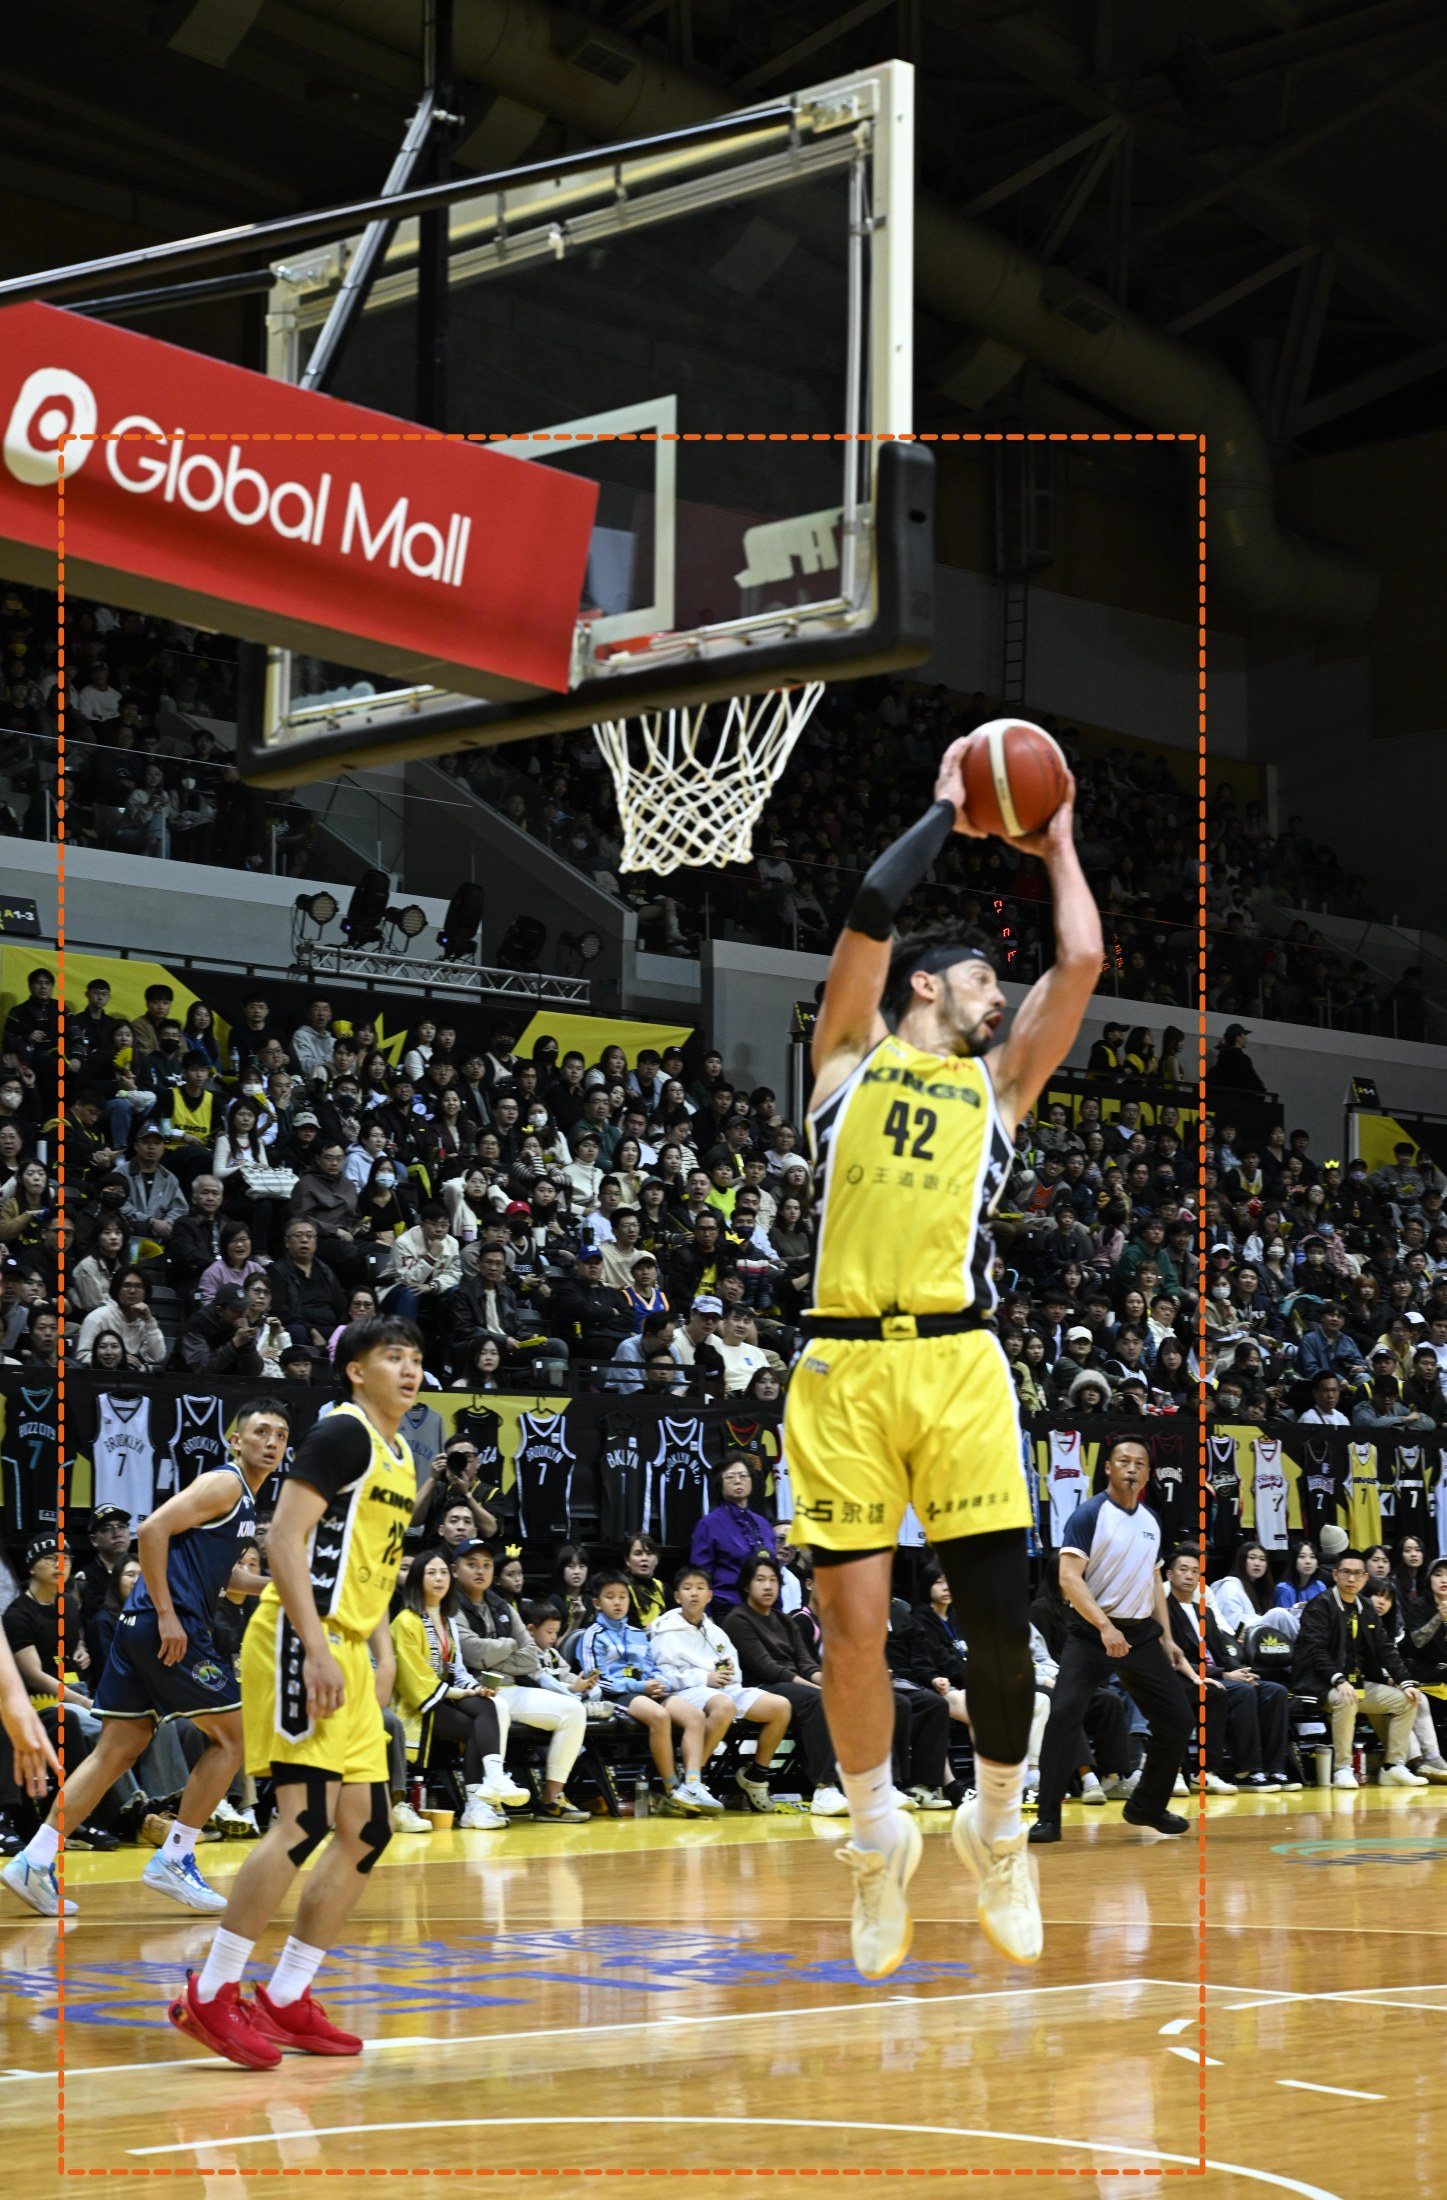
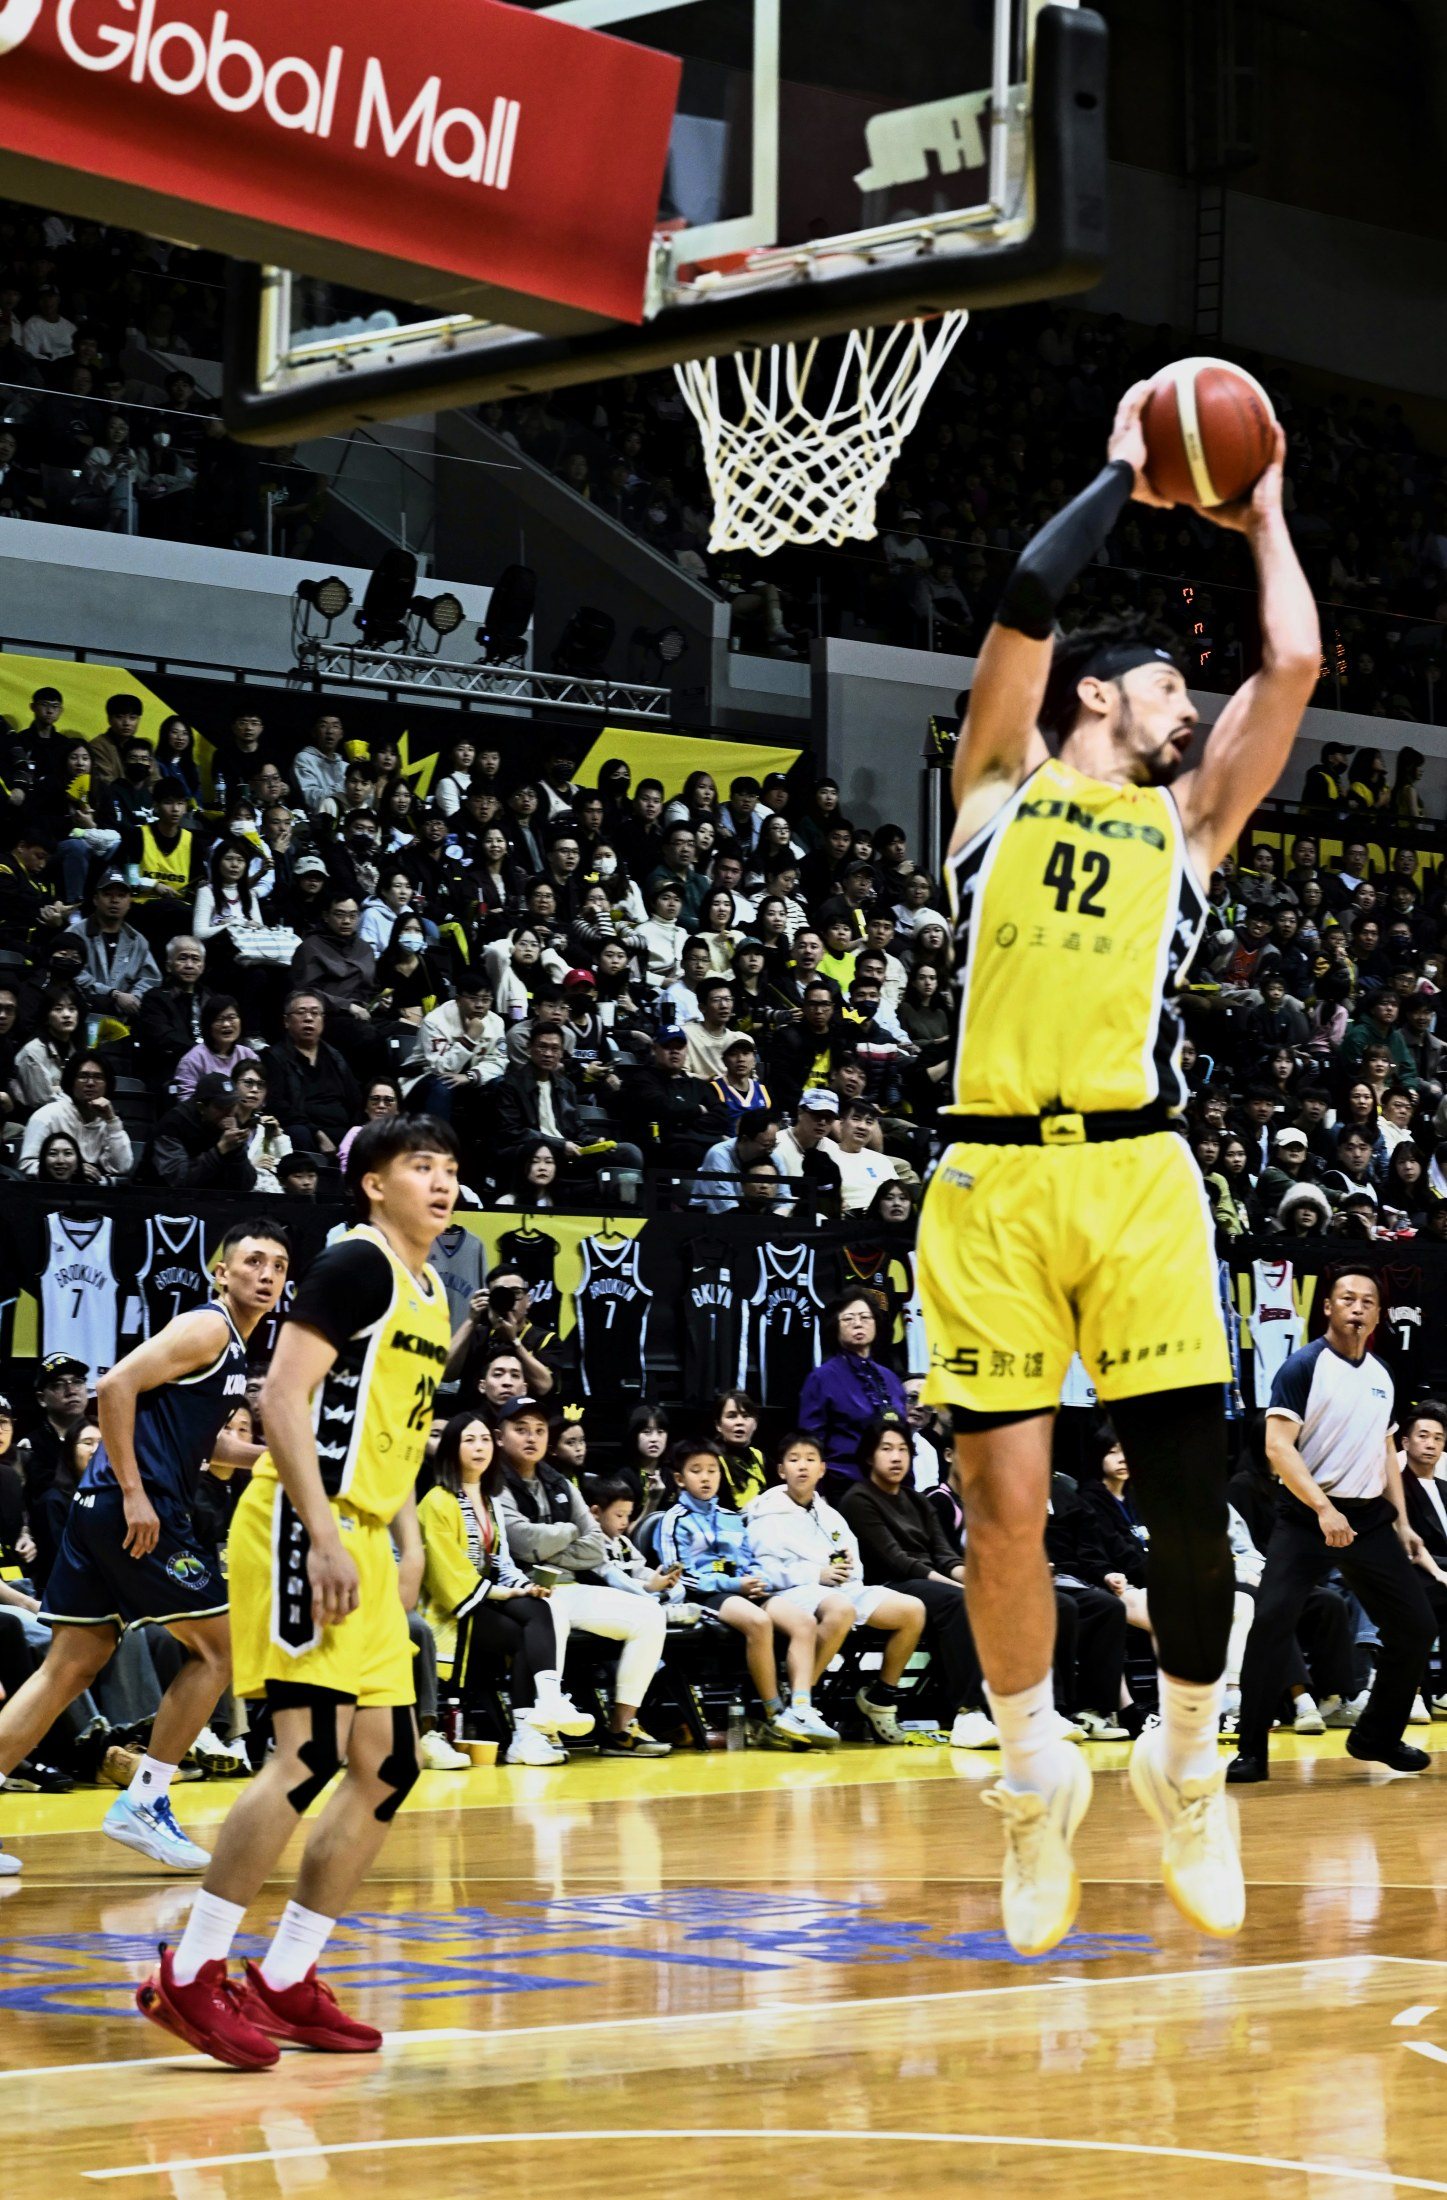
Culls toward the frame with the ball in the action and a fast shutter, and edits every shot the sports way: the floodlit court stays the bright subject, the crowd stays dark, and a crooked court gets leveled. Then the frame is CROPPED INTO THE ACTION by three rules: the crop keeps the EXACT aspect ratio of the original (so it prints to the same standard); the BALL is the focal point - the window centers on it as far as keeping every player allows (like the eye in bird photos); and the crowd is never the priority - the stadium at the top is cropped in favor of the action, and the dead dark foreground at the bottom is measured and excluded. The next two pages show the full three-step process on a real professional game: the original, the app's actual plan (dashed box = crop, circle = the ball it found), and the result.
A contested drive: the ball found (circle), the crop planned (dashed) - crowd trimmed above, dead foreground excluded - and the result at the same 3:2 the camera shot.
NIKON Z 8 · NIKKOR Z 24-70mm f/2.8 S · 70 mm · 1/250 s · f/5.6 · ISO 2000
A leap at the rim, shot vertical. The app finds the ball in the shooter's hands, plans the crop around it - stadium top trimmed, floor kept - and delivers the same 2:3 vertical, tighter.
NIKON Z 8 · NIKKOR Z 24-70mm f/2.8 S · 70 mm · 1/320 s · f/5.6 · ISO 2000
Concert / Stage mode
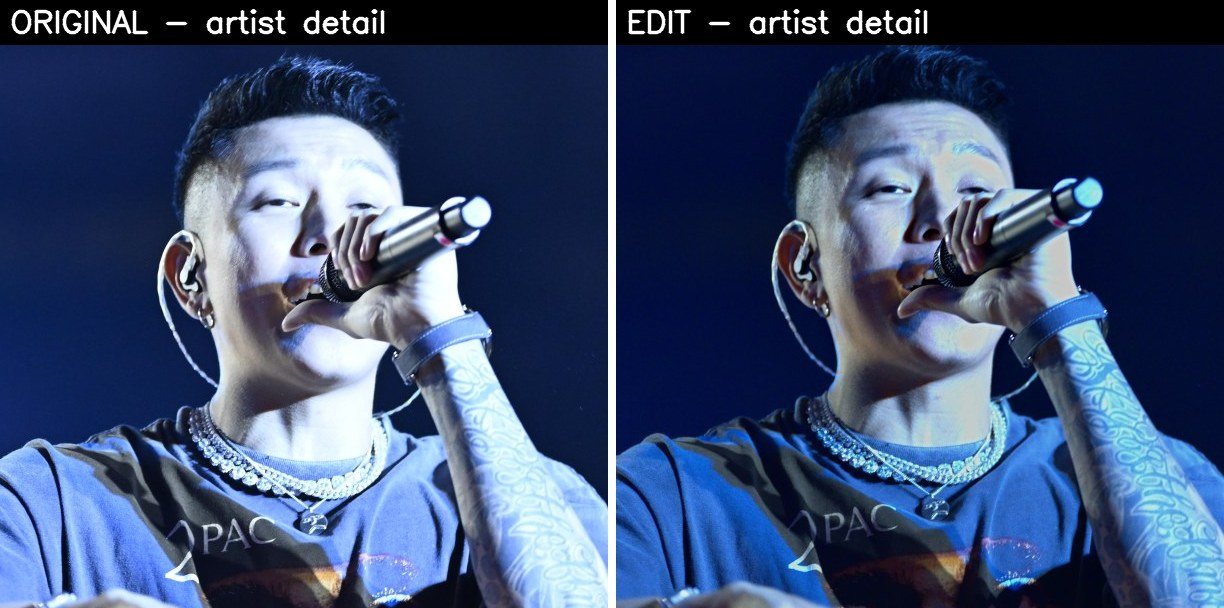
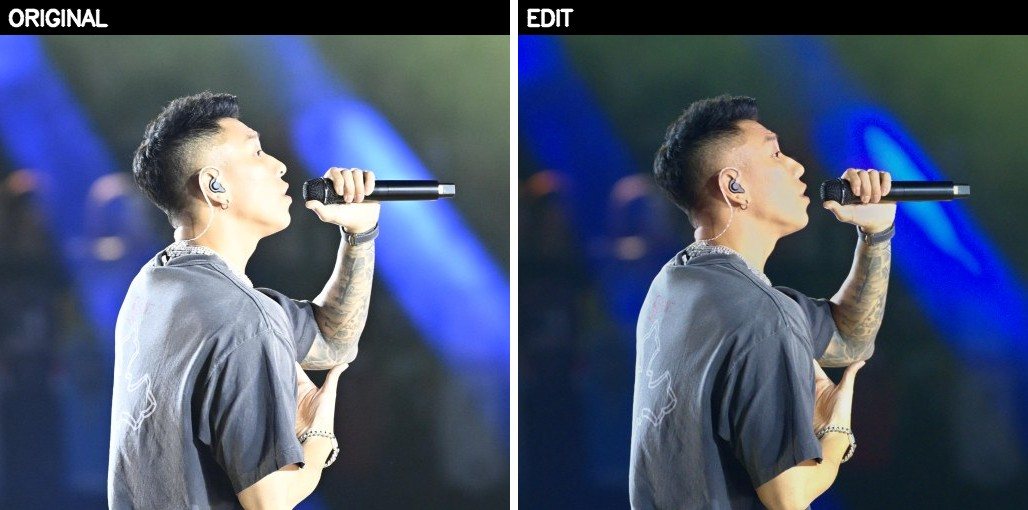
At a show, the LIGHTING IS THE PICTURE. So this mode never white-balances the gel colors away (the color is the artist's vision), never lifts the blacks to grey (drama is contrast), and never dims the beams, glow, or haze. What it does instead is LOCAL: the performer gets a targeted fill so their detail reads clearly, a face-local tame catches a white-hot spotlight before it blows out, and a subtle vignette pulls the eye to the stage. The light effects stay as shot; the artist becomes clear. Two pages from a halftime show follow.
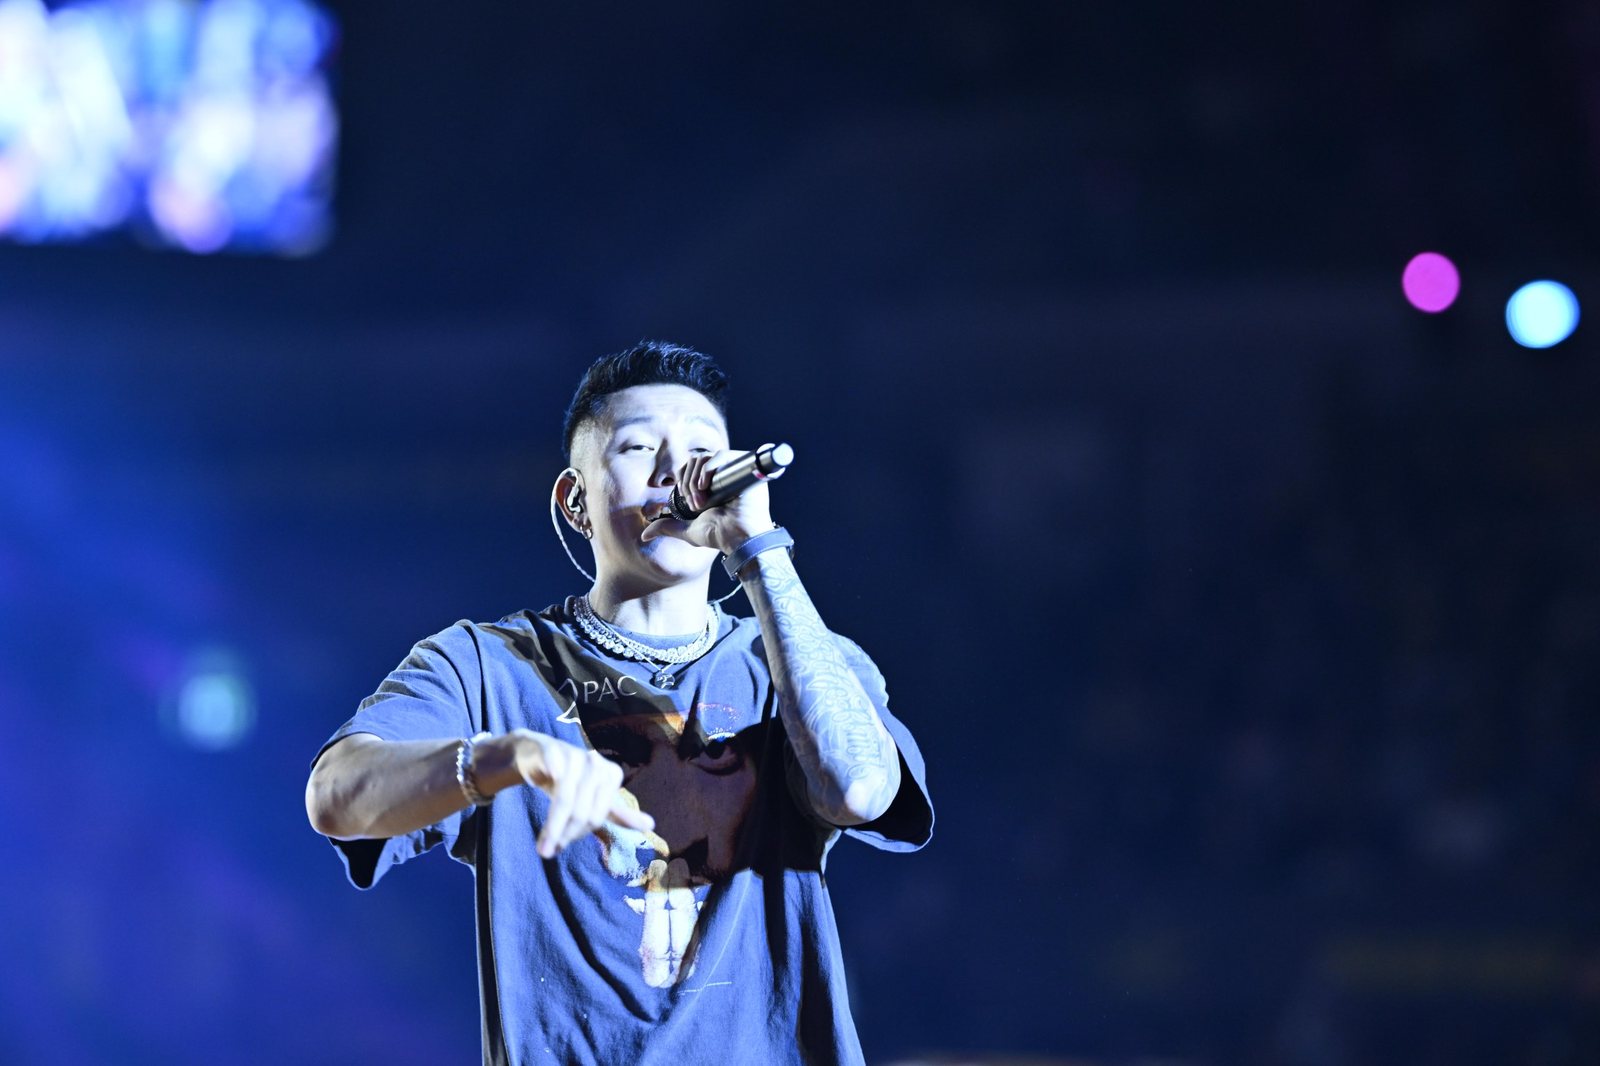
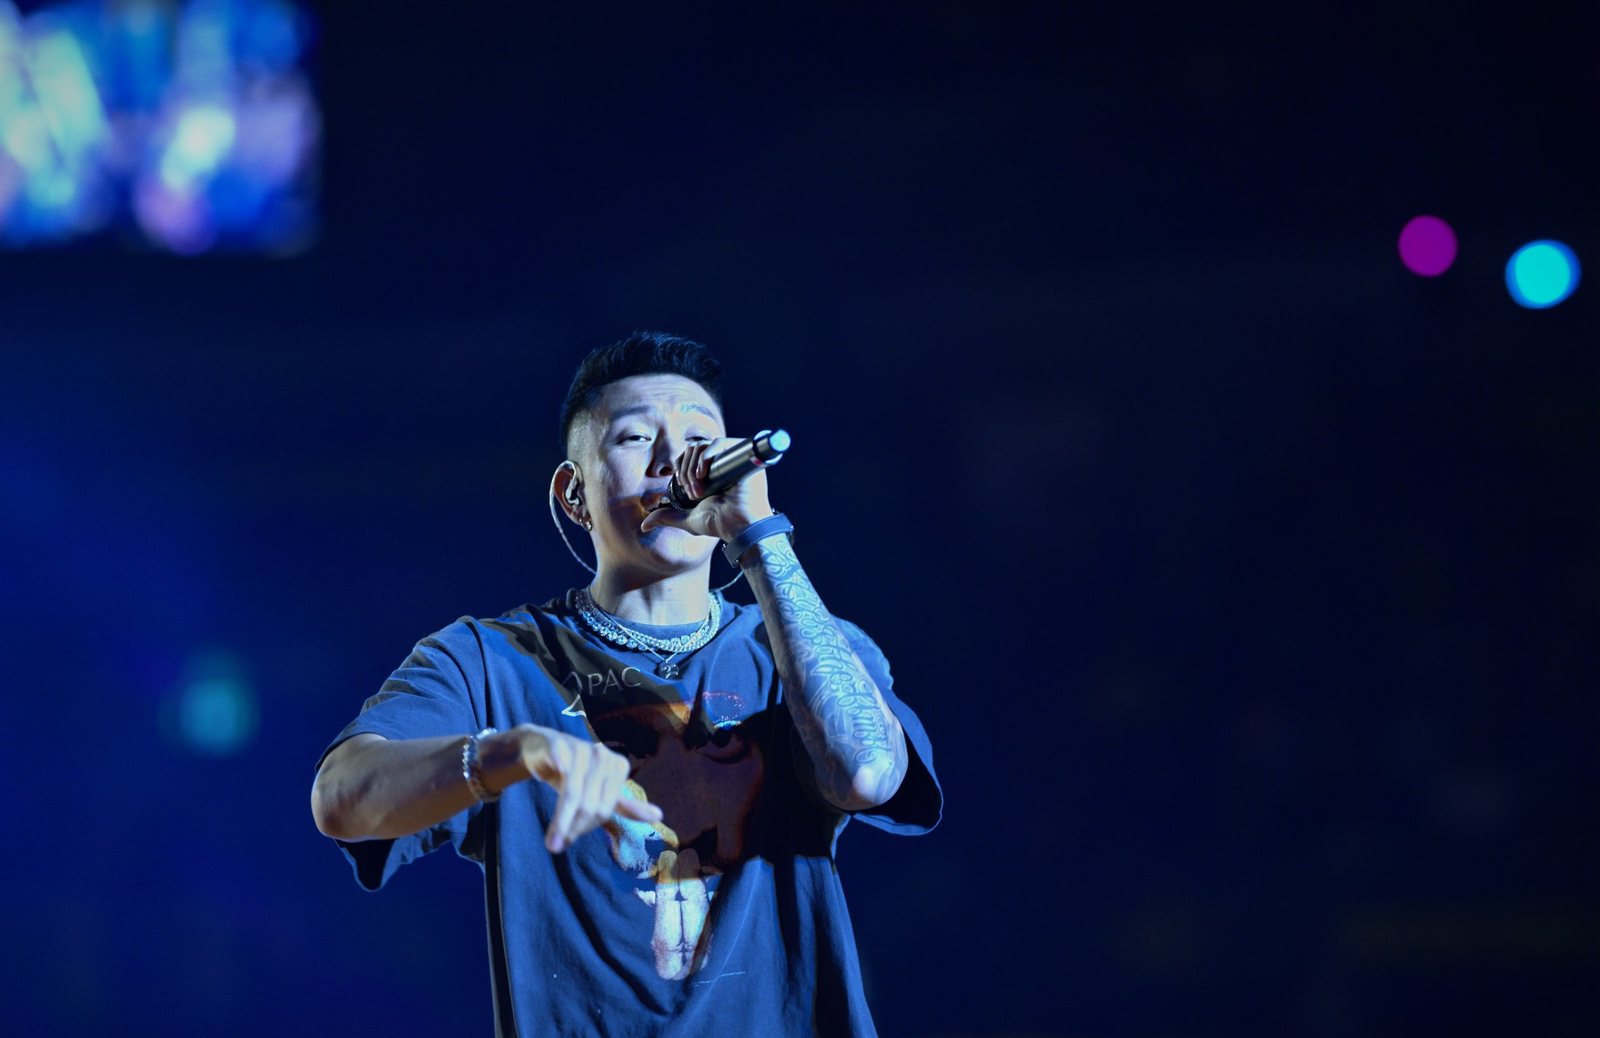
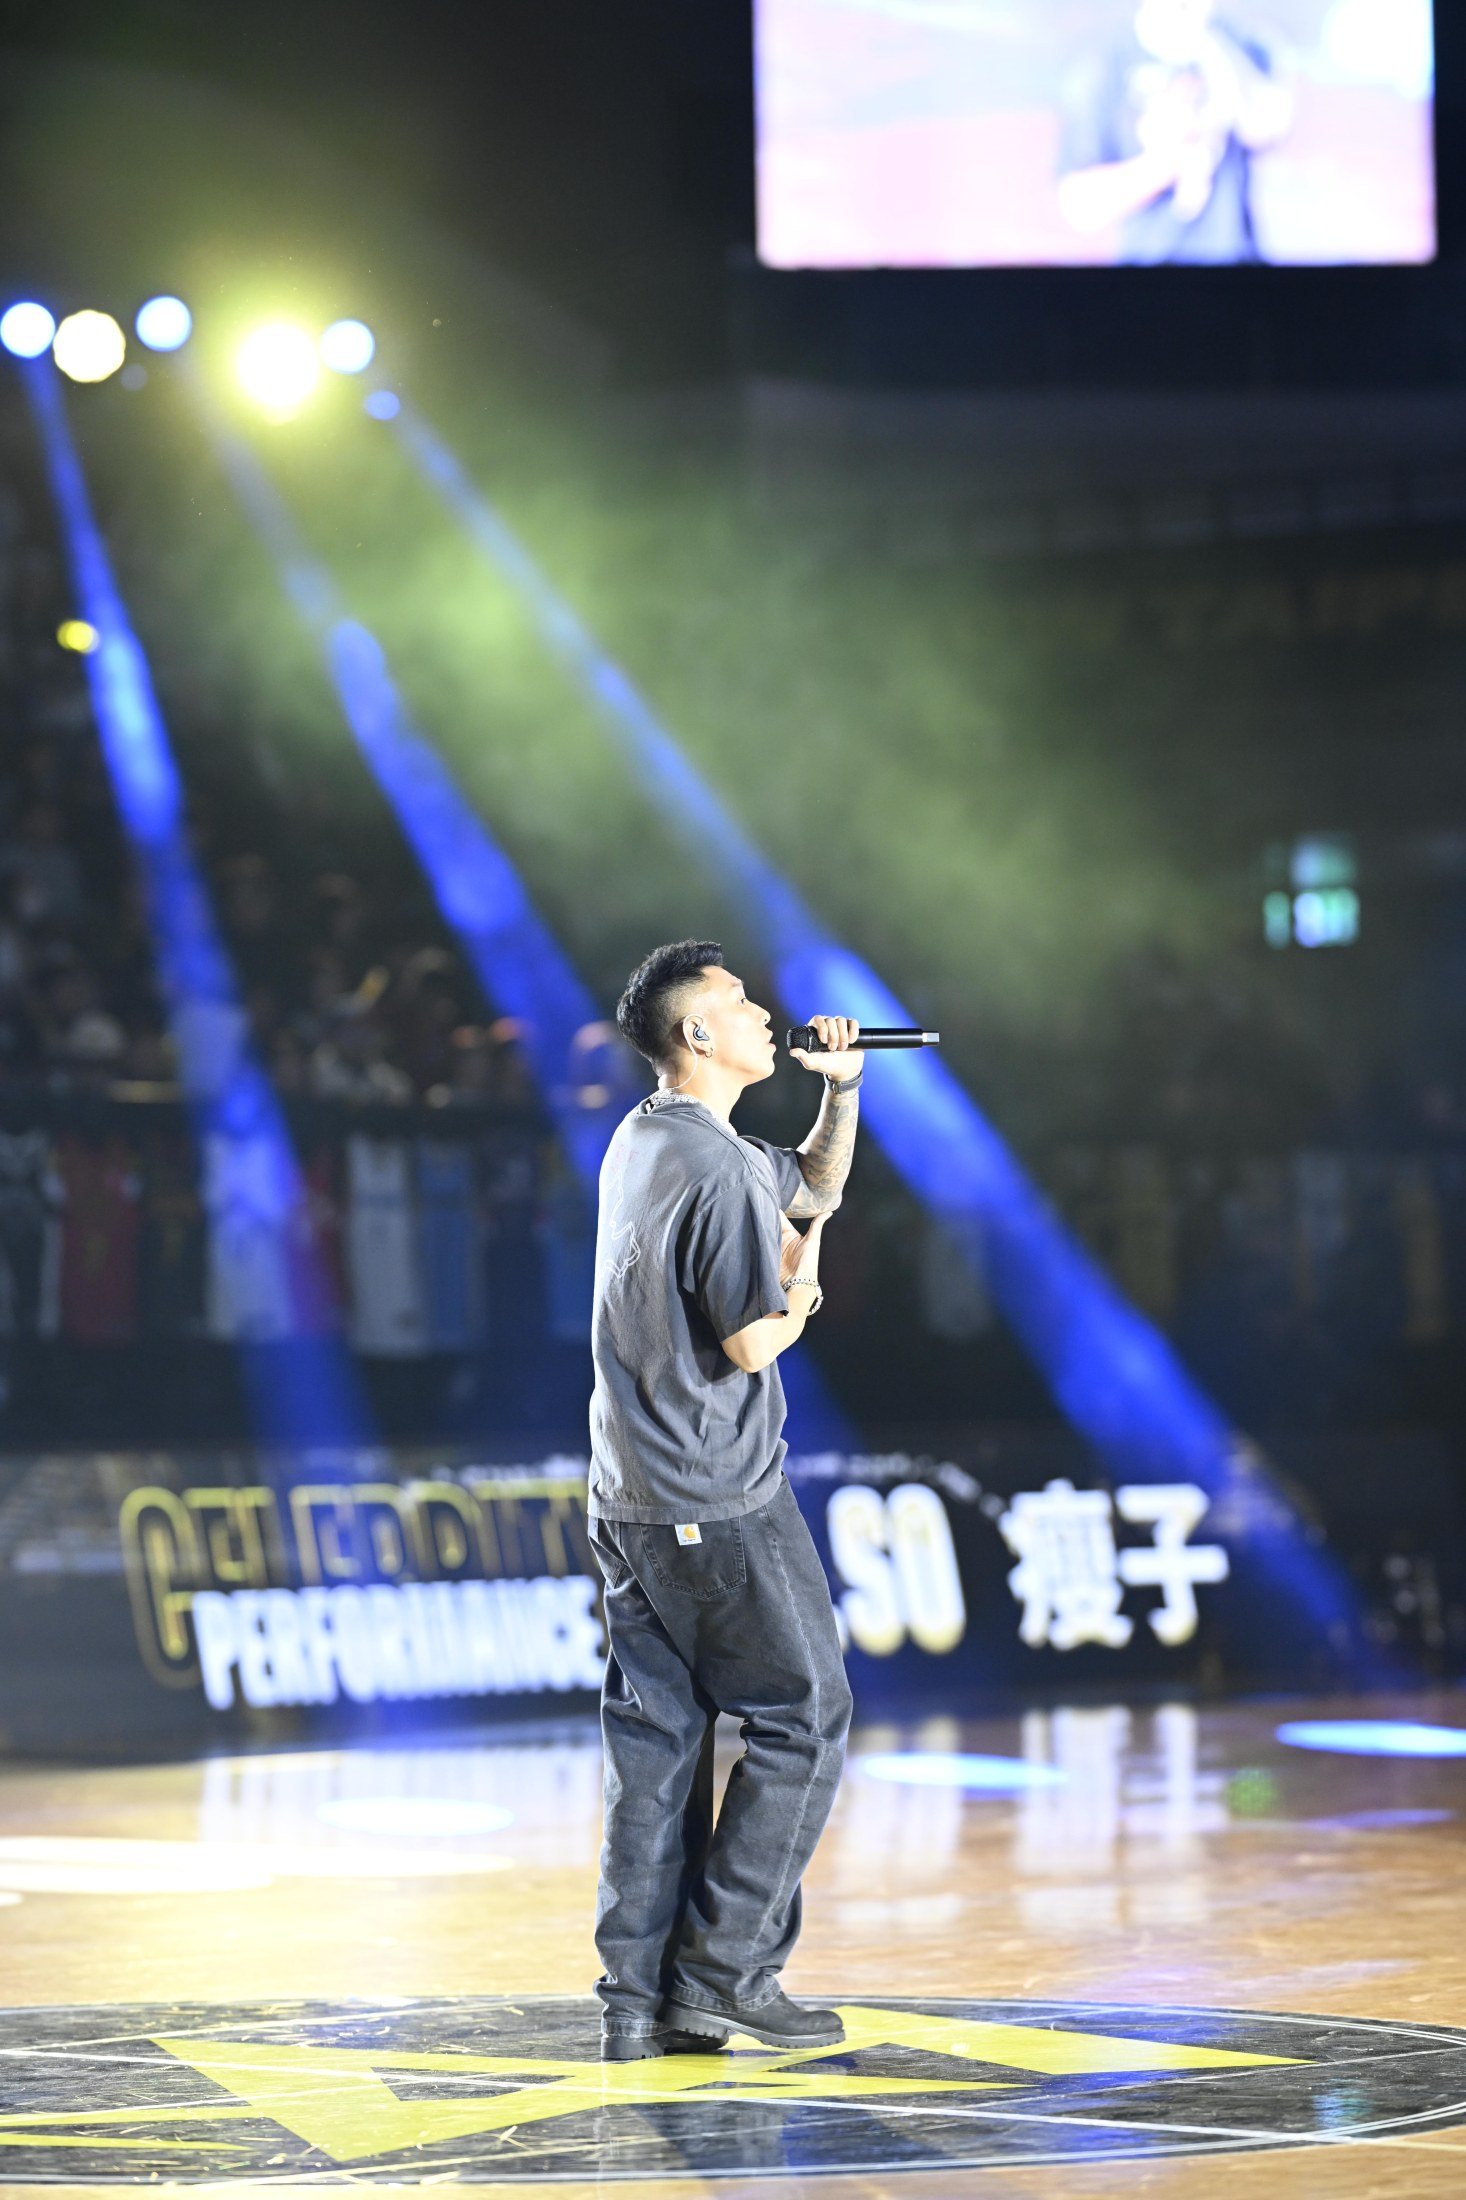
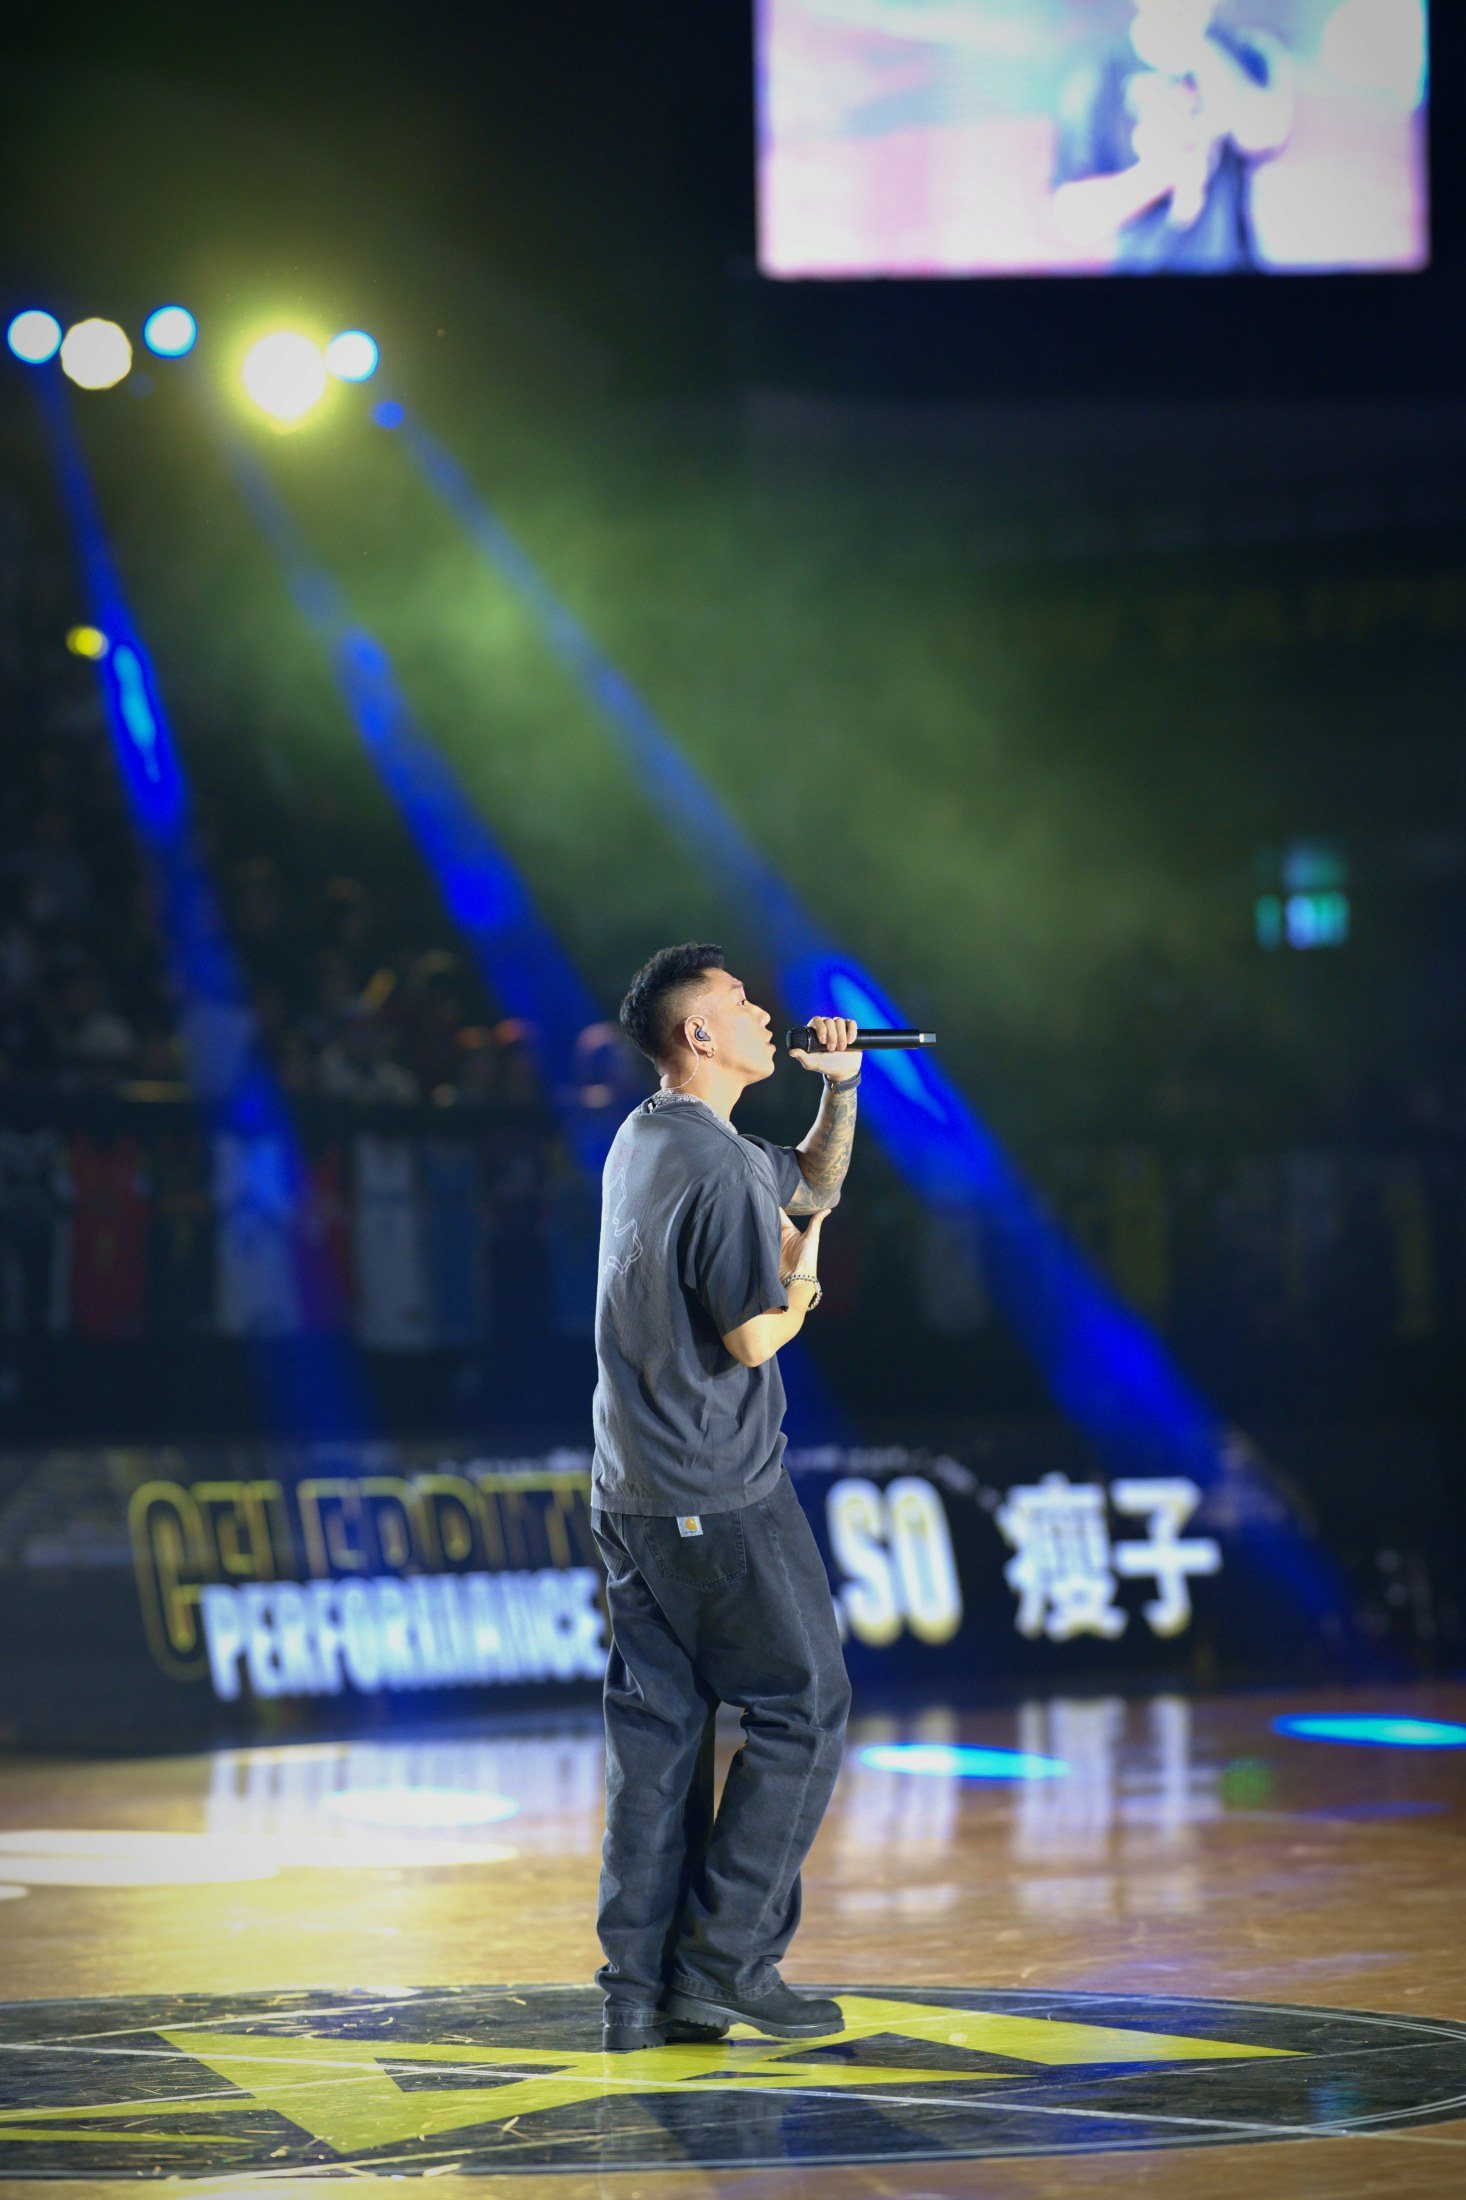
Because the whole point is that the lighting DOESN'T change, the proof lives at 100% - the artists up close, original versus edit:
Bird / wildlife mode
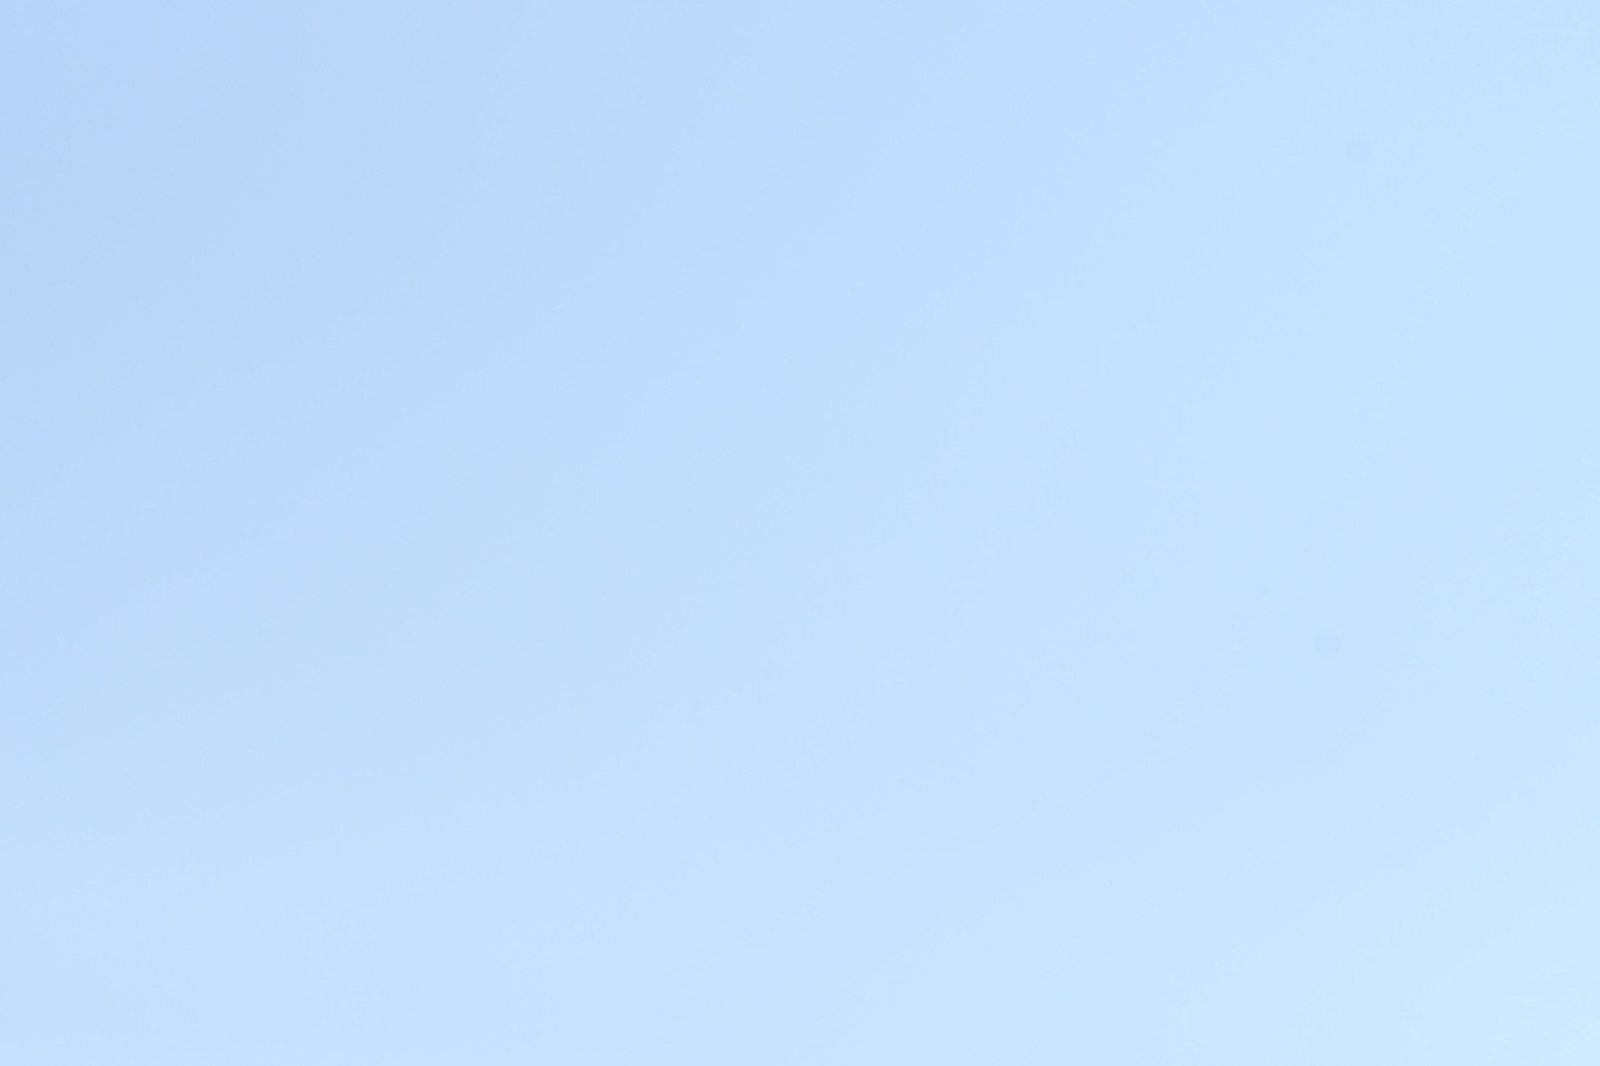
Built with a simple field truth: when a bird takes off, you hold the shutter down. Most of the burst is empty sky or motion blur — but the three sharp frames are gold, even if the bird is dark or badly placed in the frame. So bird mode culls on focus alone:
- Keep — every frame where the bird is genuinely in focus - even underexposed, even off-center. Those are fixable.
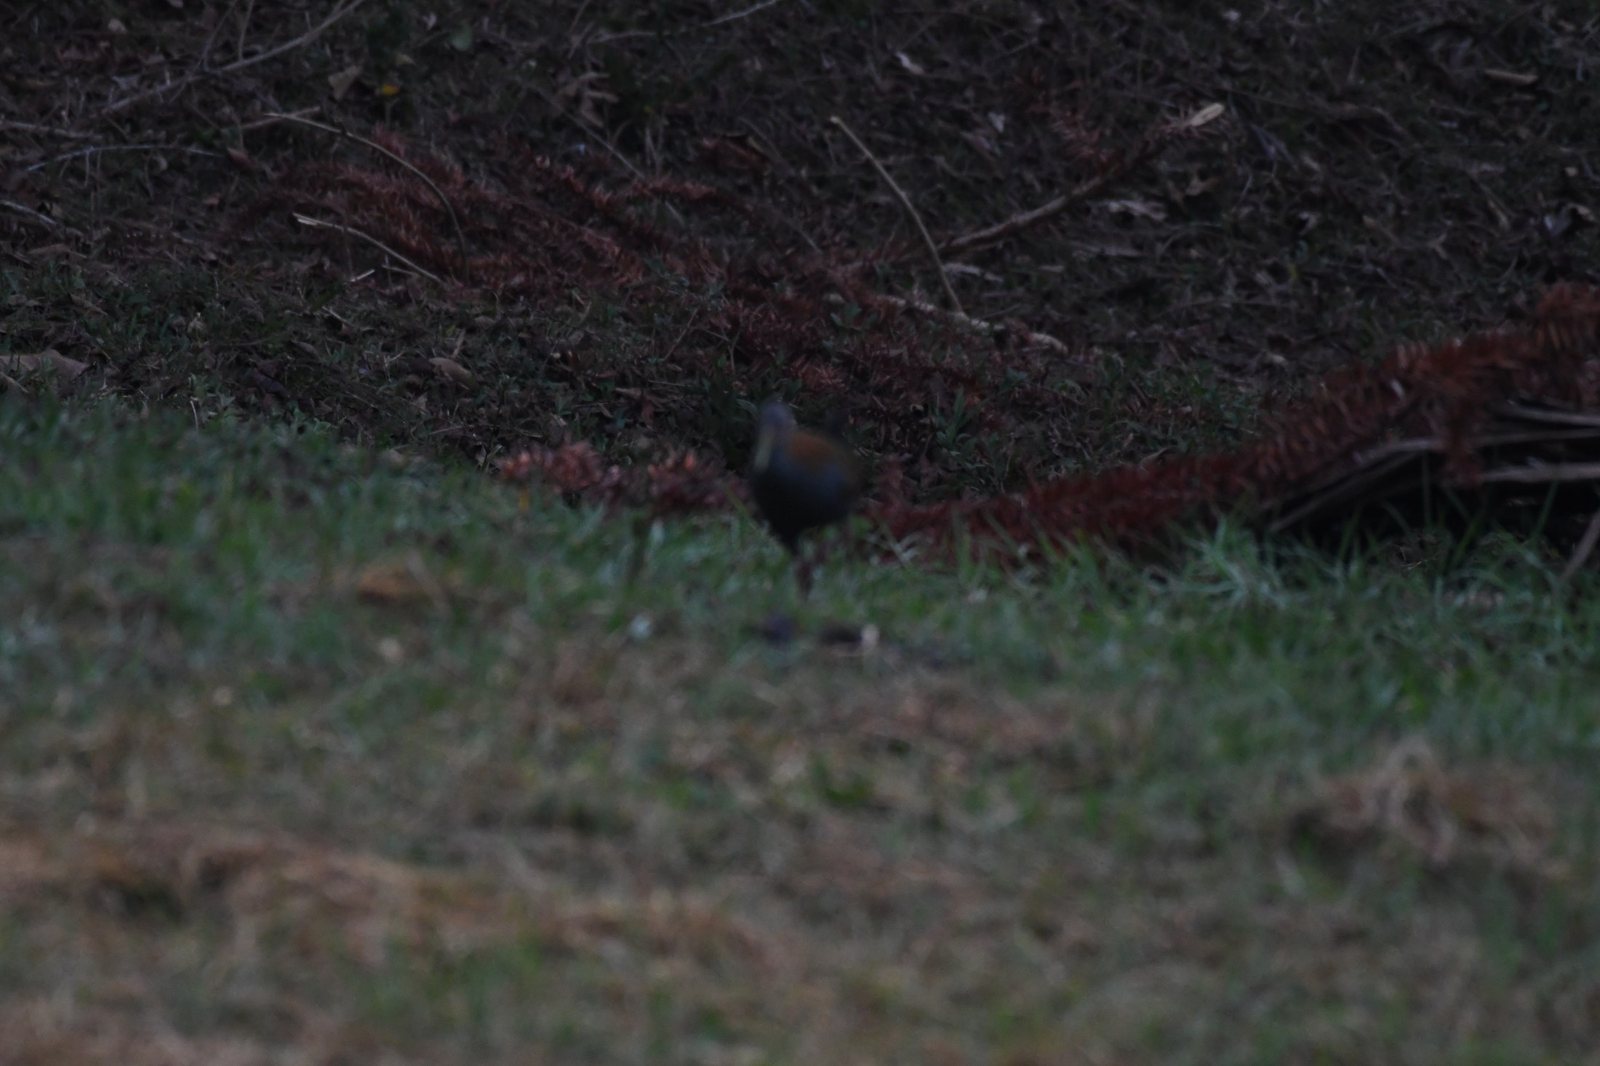
- Drop — only the true misses: the bird flew out of frame, or it's a motion-blur smear.
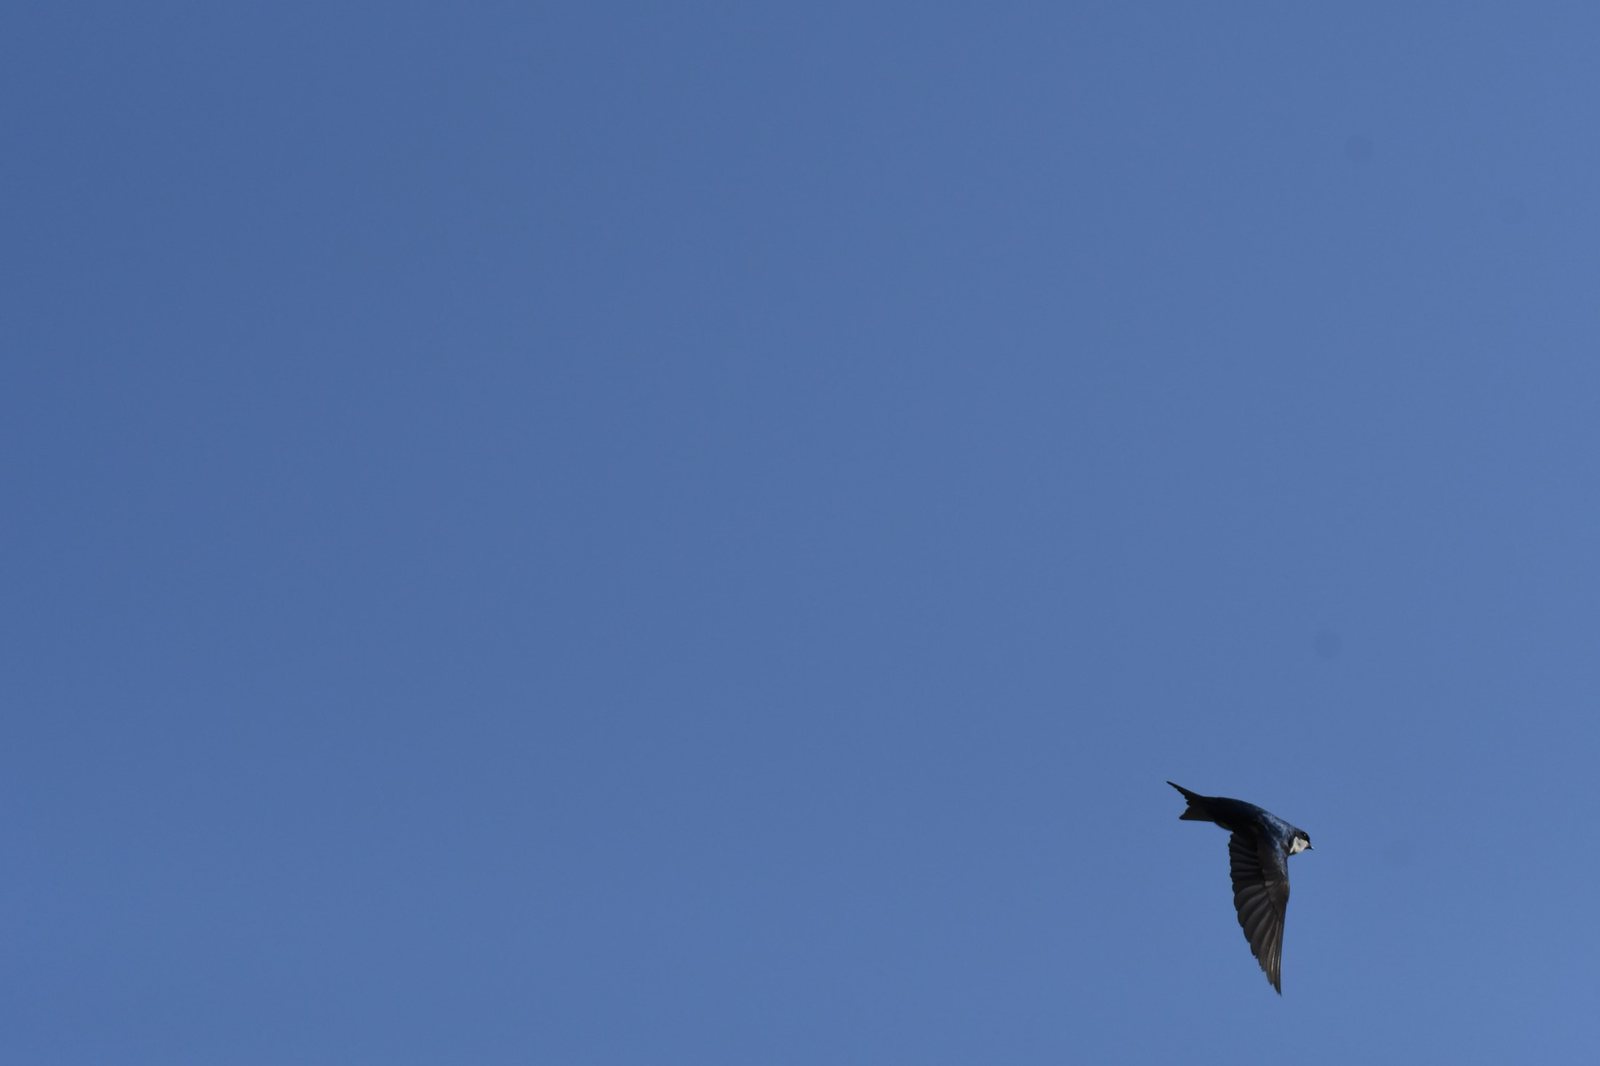
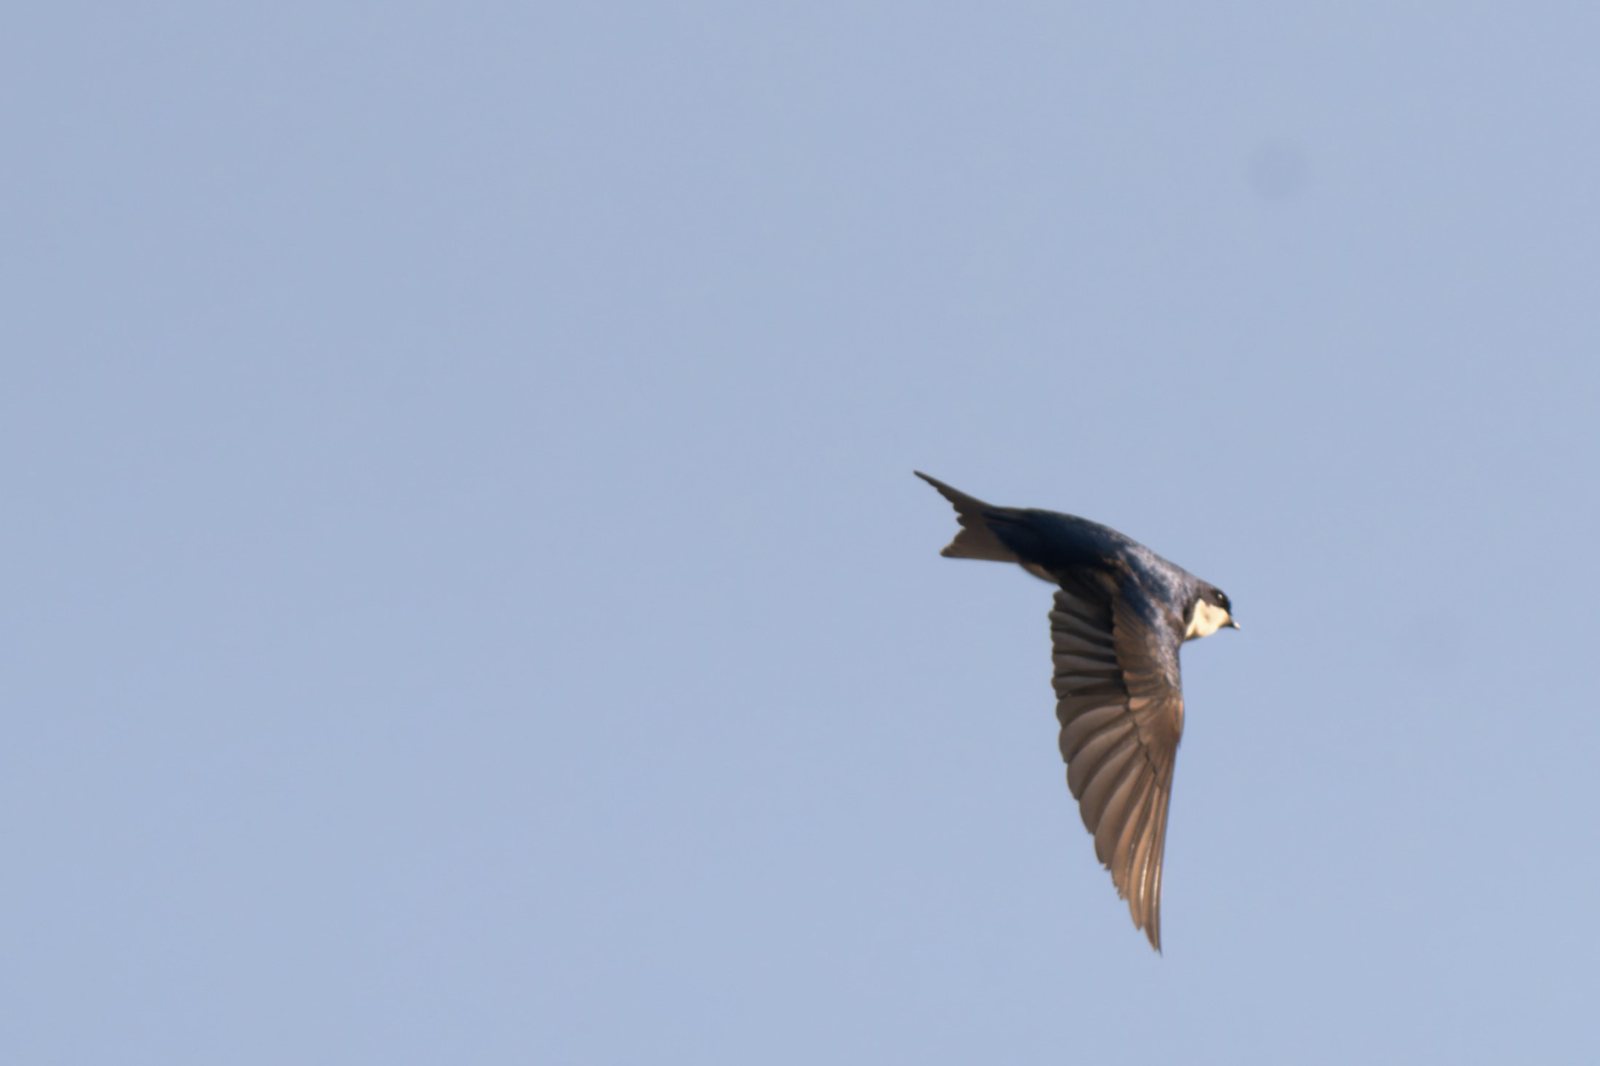
- No de-duplication — a burst of a banking swallow is many different keepers, not one.
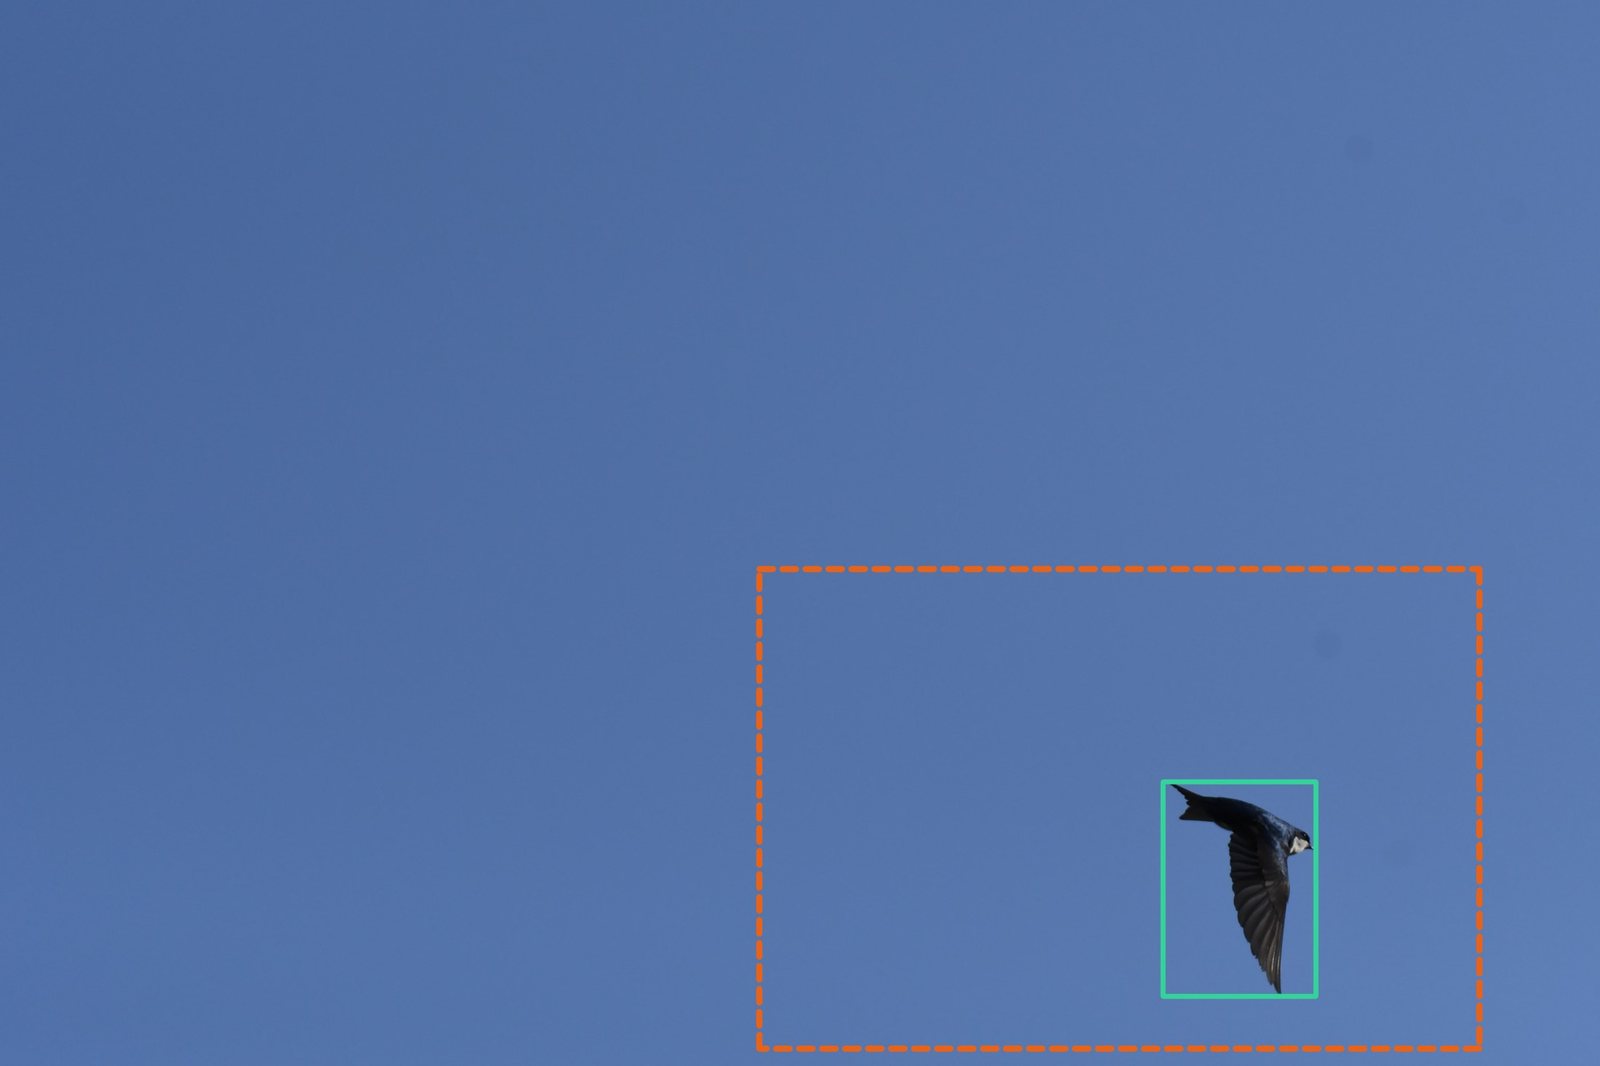
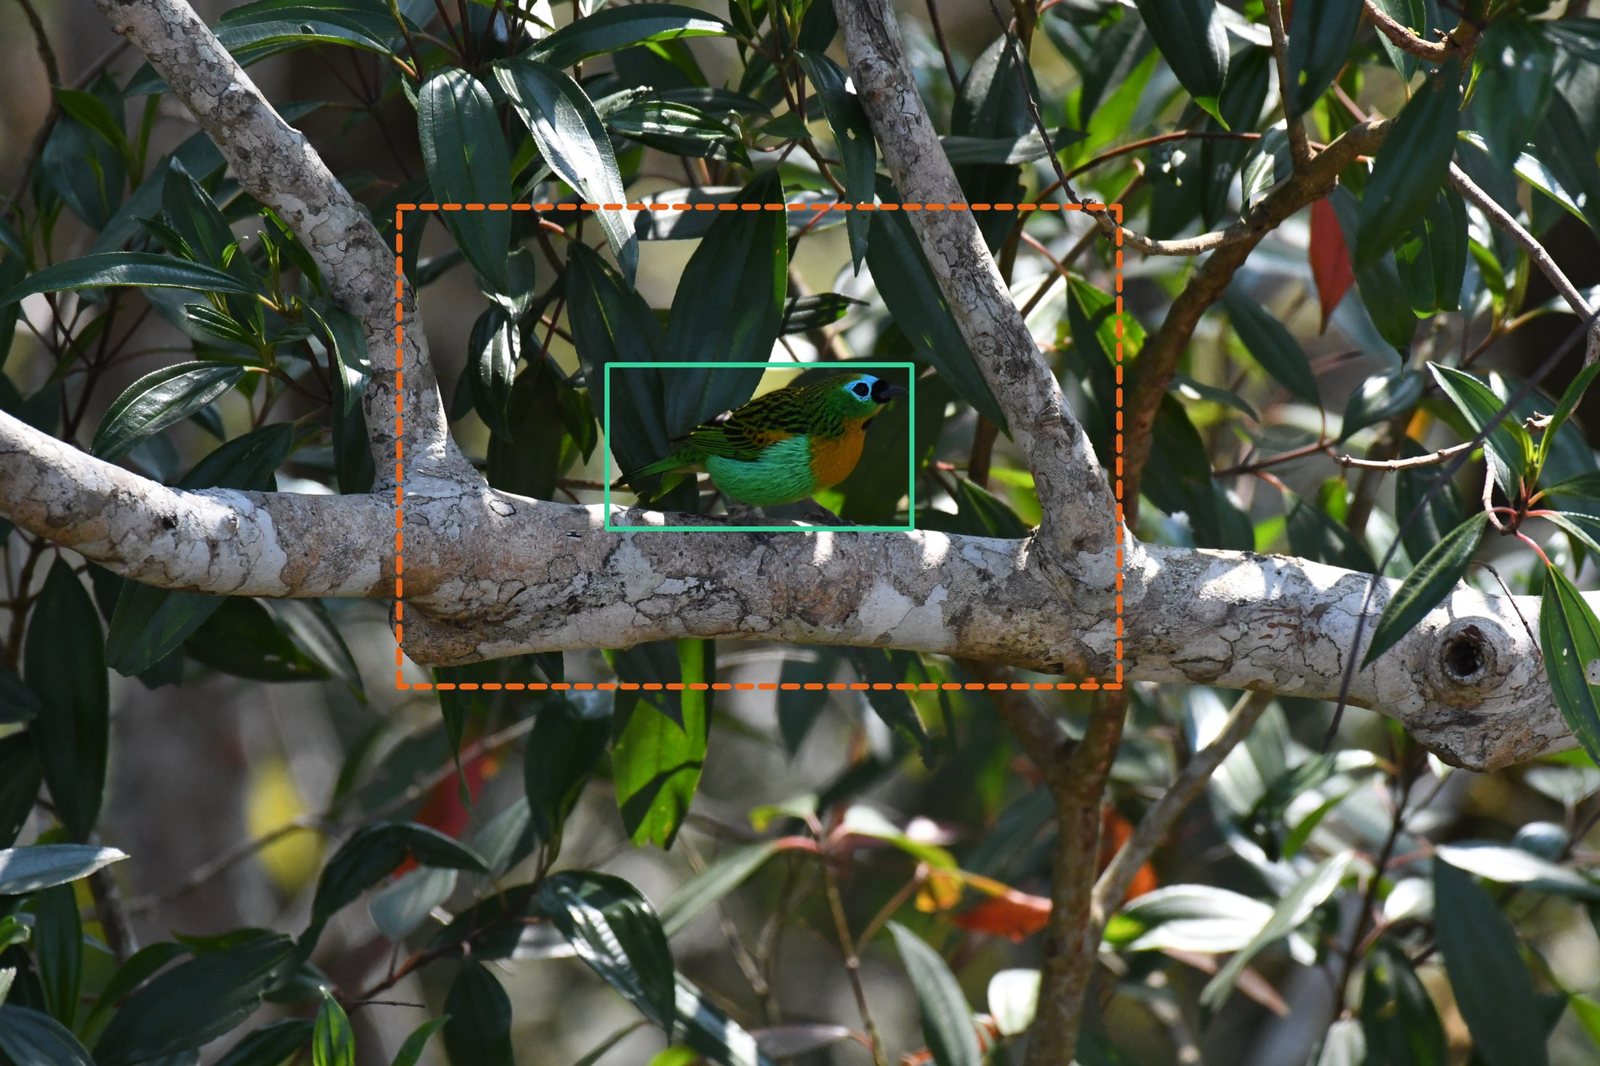
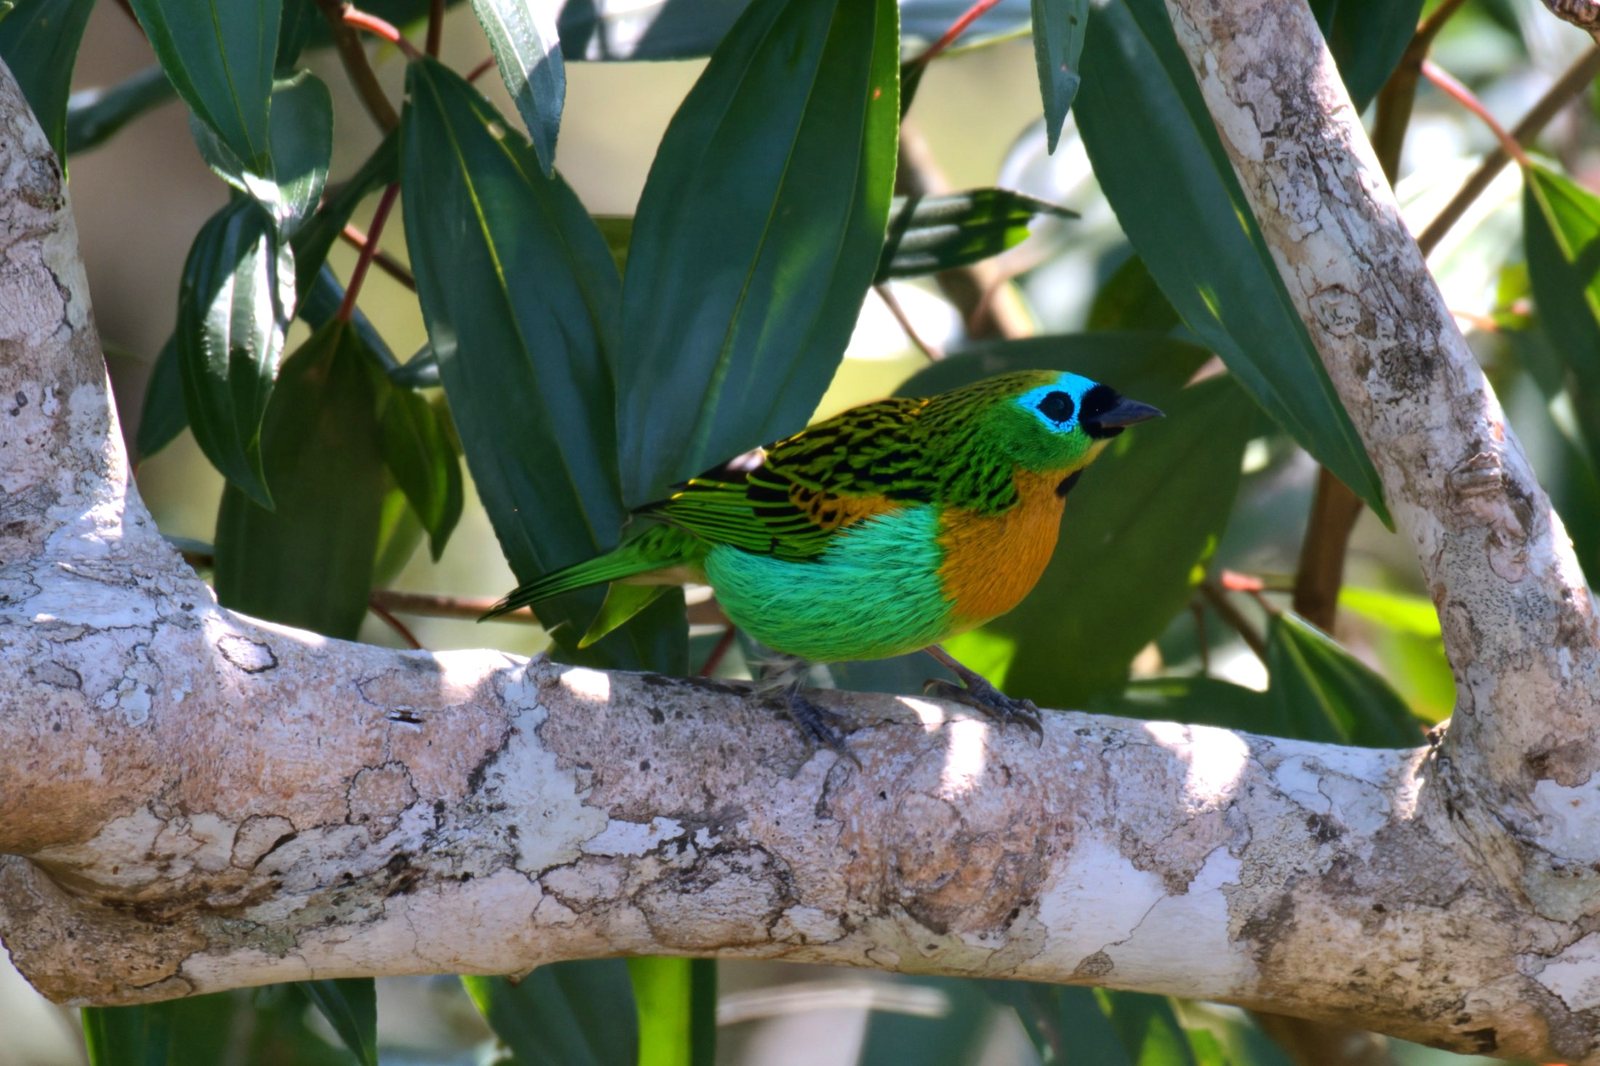
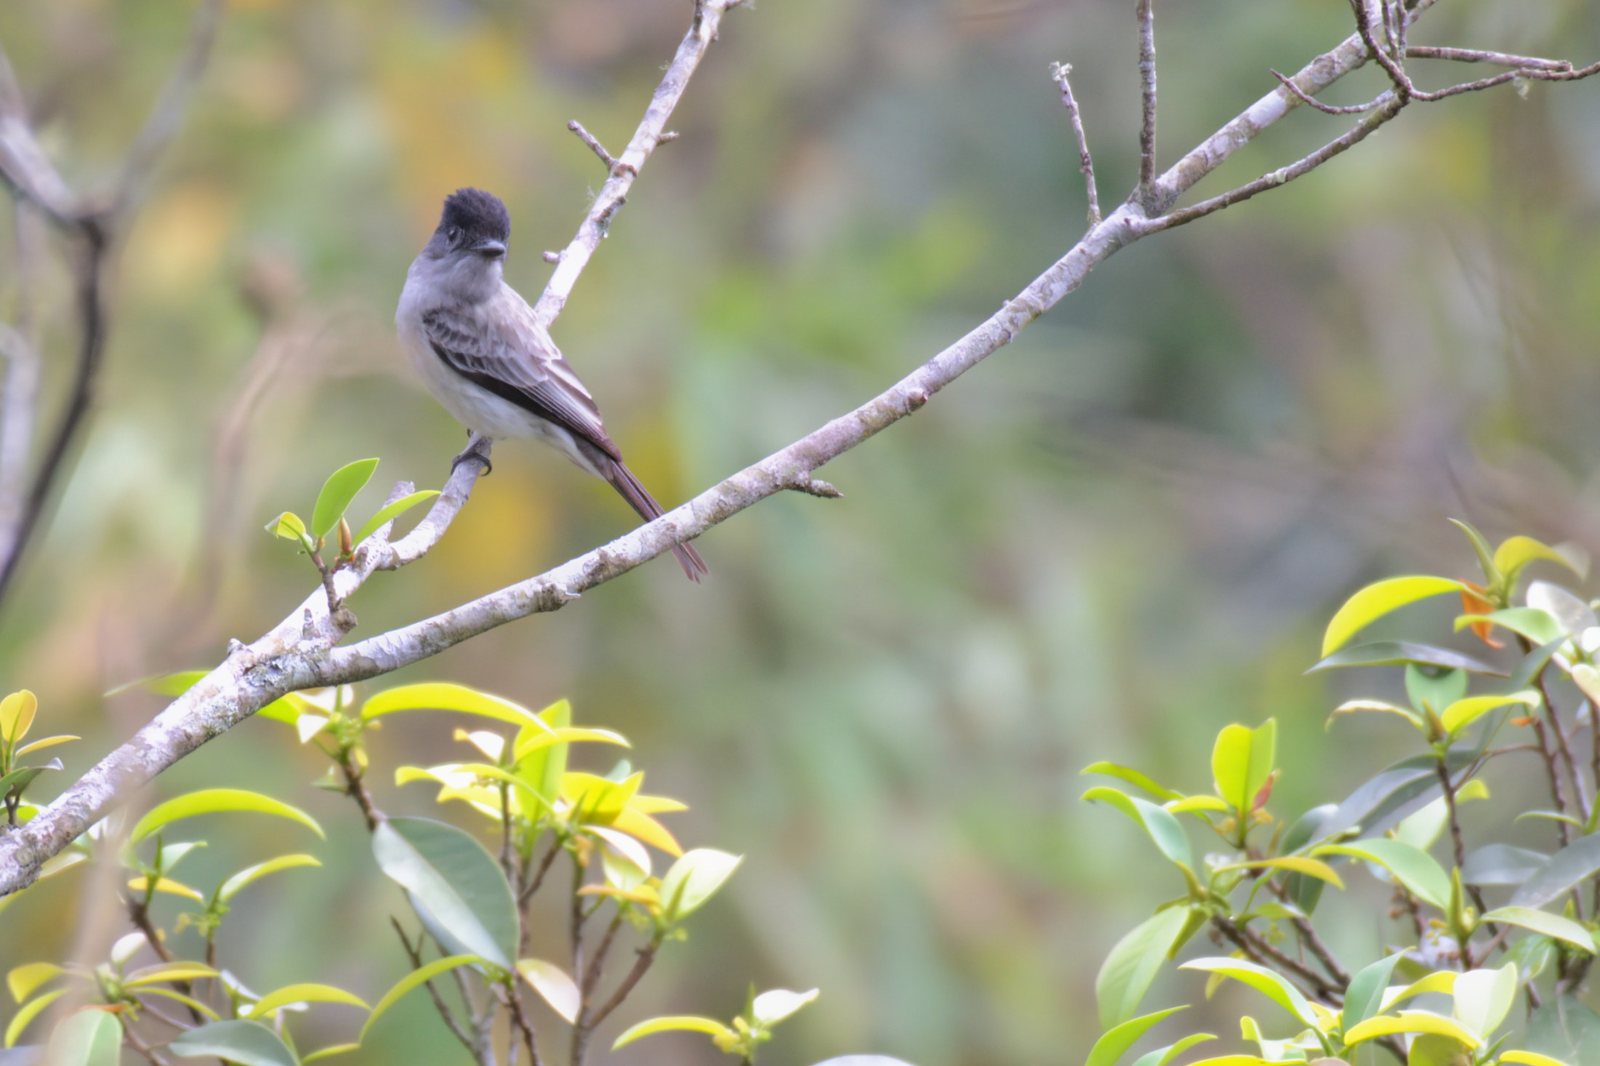
Then the edit does what you'd do by hand: cleans the high-ISO grain while keeping feathers sharp, brightens the bird, and re-crops — tight on a lone bird (rule-of-thirds when perched, centered when it's action), wider when there's a flock.
The normal cull would have been wrong here, and provably so: its keep-the-brighter-frame and one-per-scene logic would discard exactly the dark-but-sharp flight frames the photographer wants. The focus-only rule came straight from the photographer's own rejects, and the final gate was validated the honest way: he reviewed all 379 frames the mode culled from a real 4,107-shot day and confirmed not one keeper was lost.
Measuring bird sharpness also needed its own invention. Averaging sharpness over the bird's area failed - a tiny sharp swallow against smooth sky scored LOW because its box was 98% sky. The fix measures the bird's crispest EDGE instead: a razor outline scores high at any size; only real motion blur collapses it.
Bird detection reuses the EfficientDet-Lite2 model already bundled for sports (its COCO classes include “bird”) - zero new dependencies. Detection runs full-frame plus a 2×2 overlapping tile pass to catch small distant birds. The focus gate: confident, adequately sized birds are judged by edge acutance (99.9th-percentile raw Sobel gradient magnitude in the tightened box, fixed 256² resize); everything else is judged as a scene, which is exactly how empty flew-away frames fall out.
What gets removed
First, the only two kinds of frame bird mode ever throws away - both from the real 4,107-shot validation day:
Three birds, three steps each
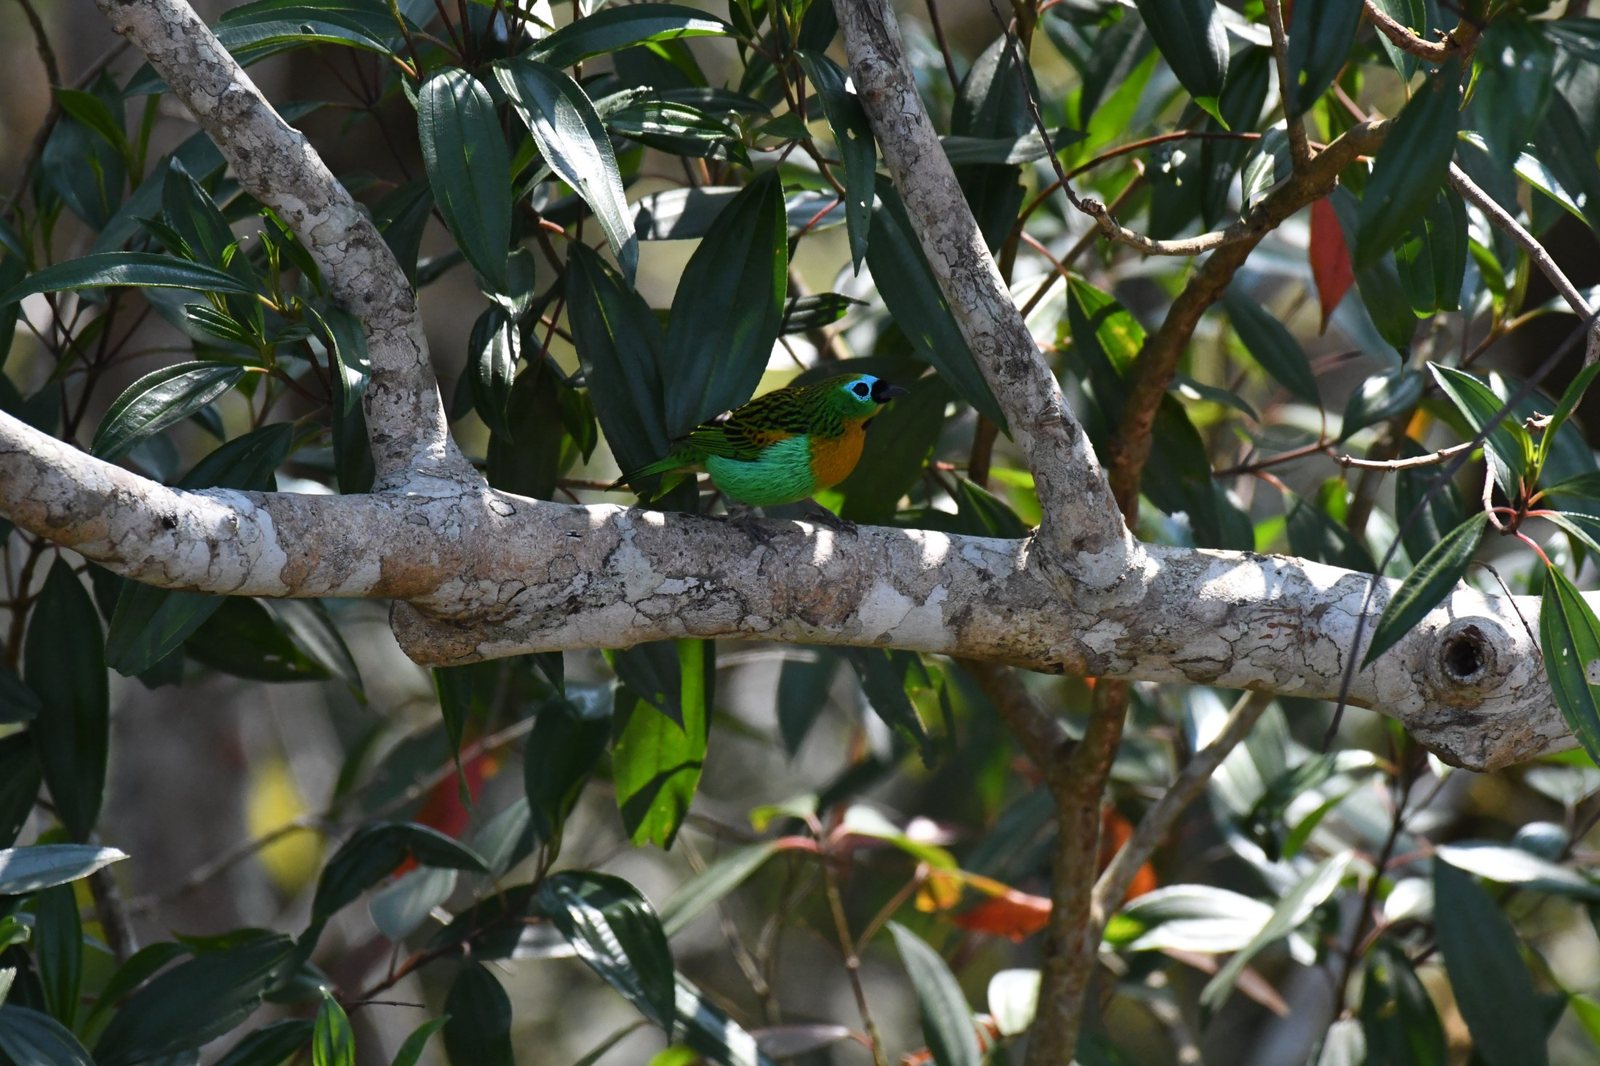
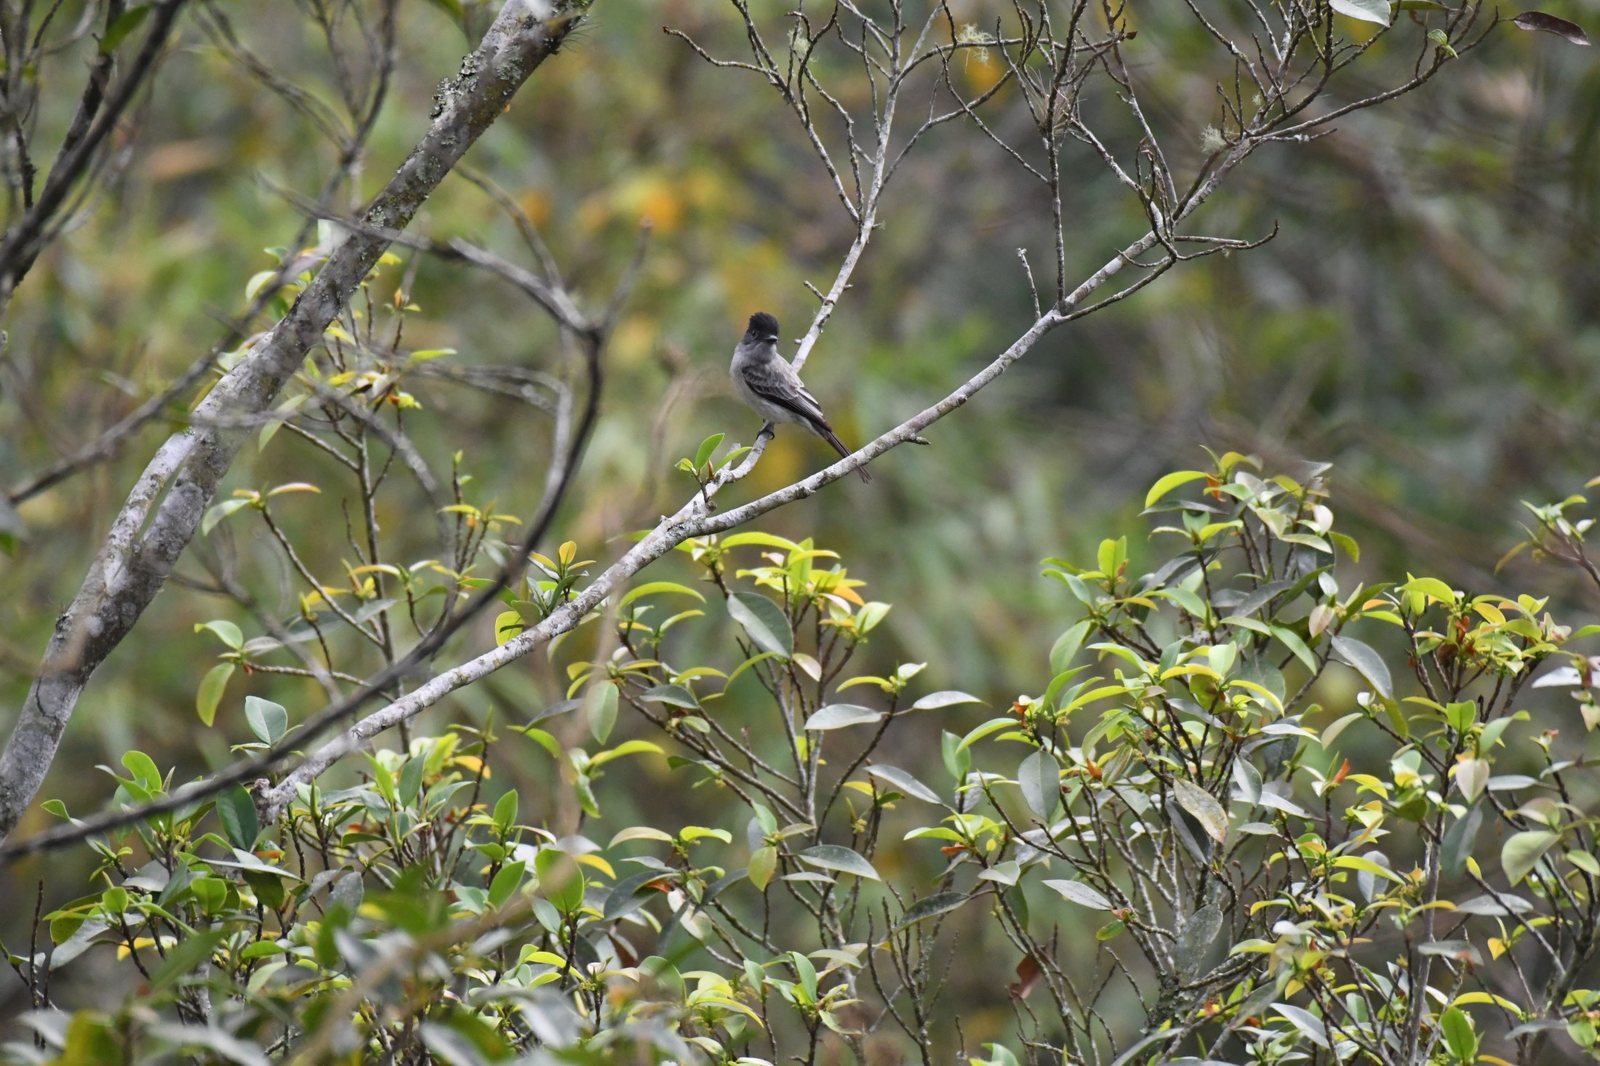
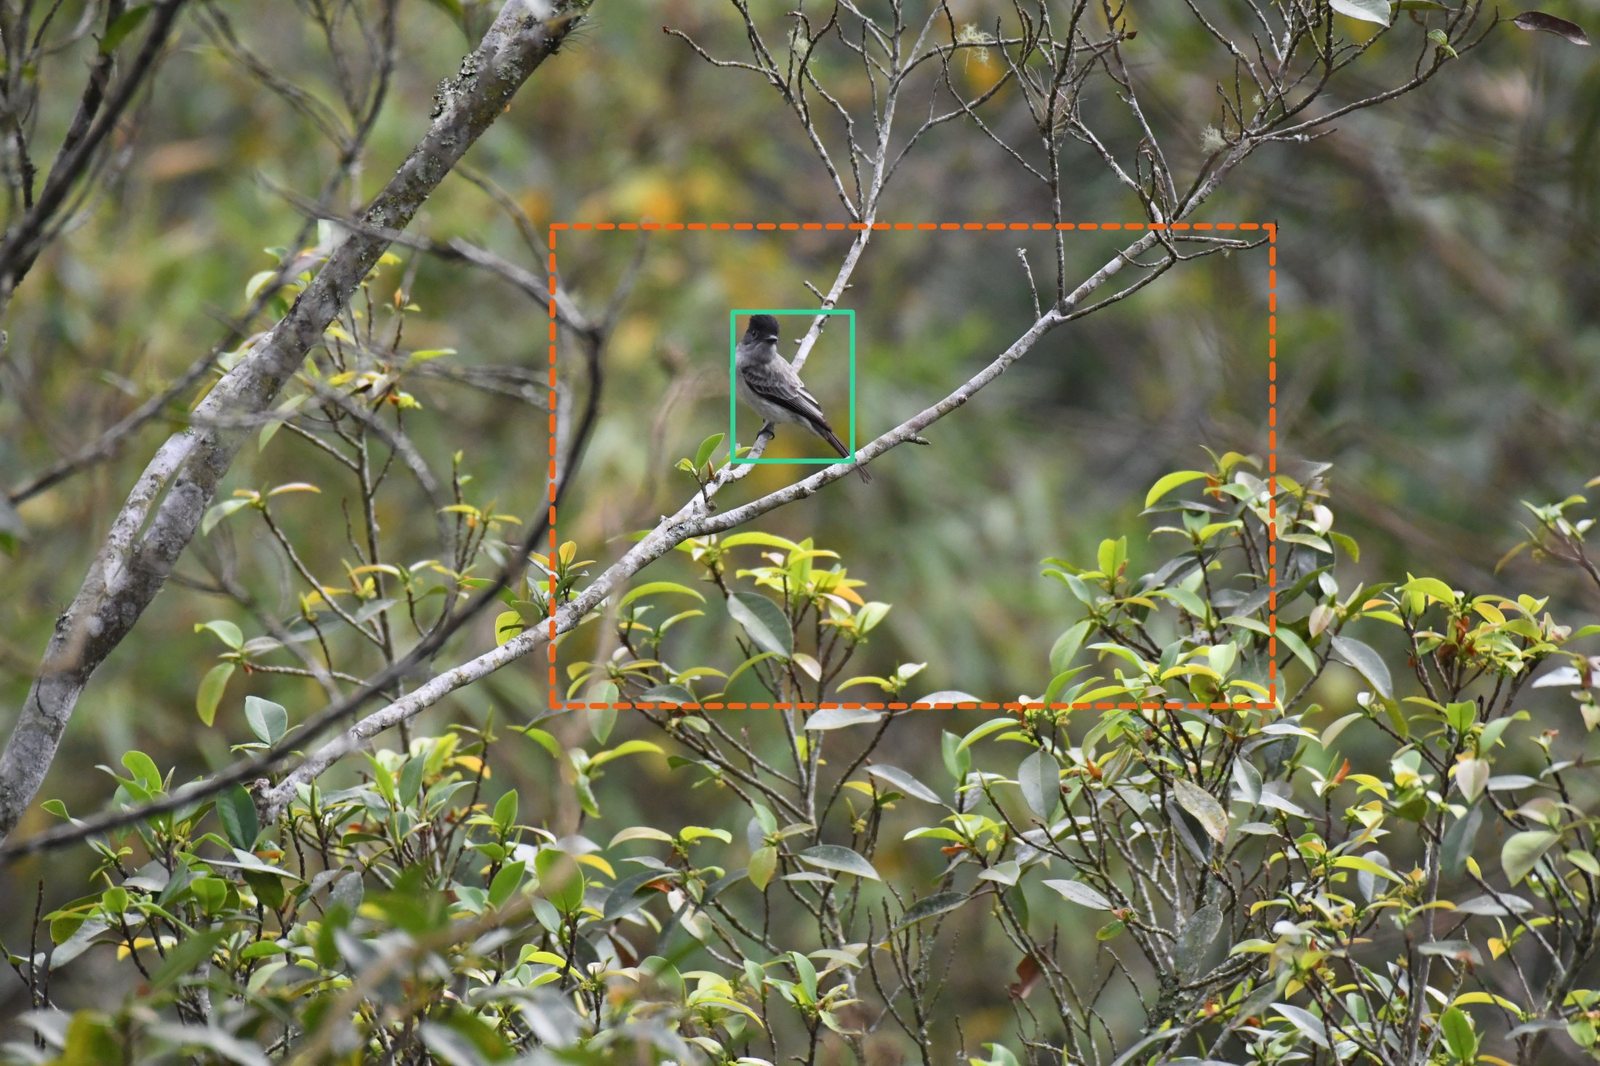
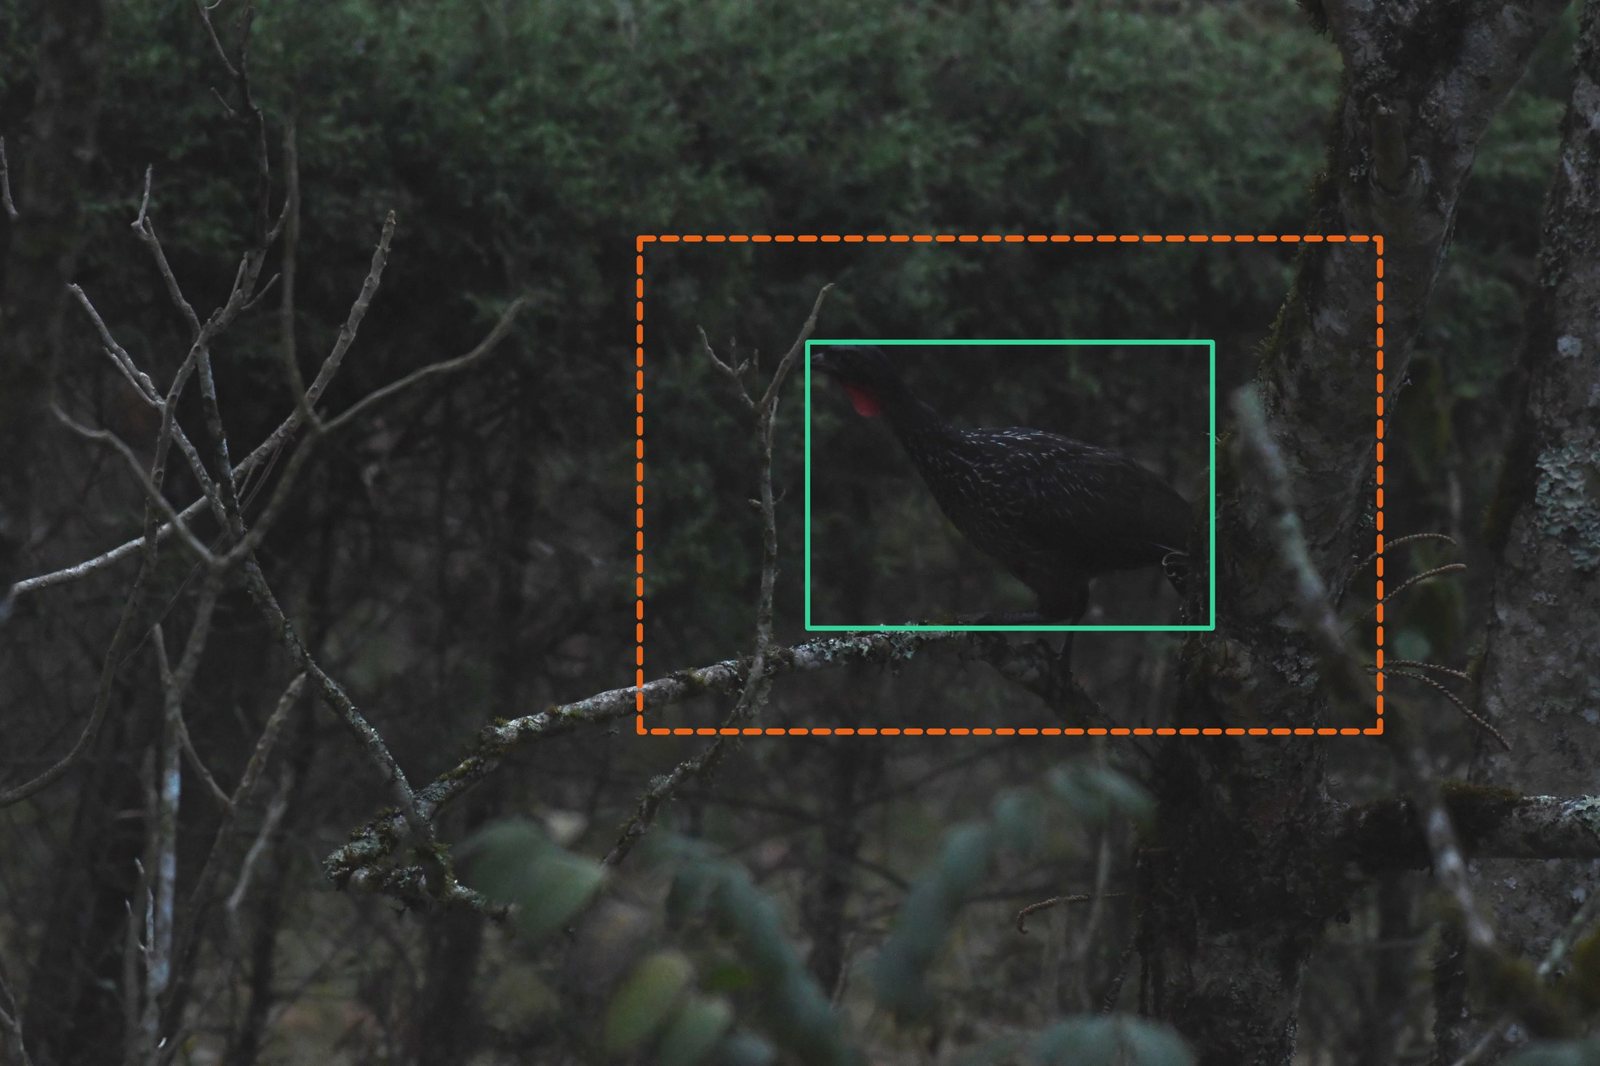
Everything that survives the cull goes on the same journey, and the next three pages show it whole - each bird on a single page. Step 1 is the frame straight off the card. Step 2 shows what the app actually saw: the green solid box is the bird it found, and the orange dashed box is the crop it planned around that bird. Step 3 is the finished photograph.
Product Photos mode
A different job entirely: makeup and cosmetics shots for listings. The product is cut out cleanly, lighting and color are corrected, and it's placed on a background you choose — square-cropped and consistent across the whole set.
8 · AI Denoise — cleaning grain the modern way
Classic noise reduction works like a very smart blur: it finds similar patches and averages them. On mild grain that's fine. On heavy grain — an ISO 4000 bird at dusk — it faces an impossible choice: leave the grain, or smear the feathers. It cannot win, because averaging can only remove; it can never rebuild.
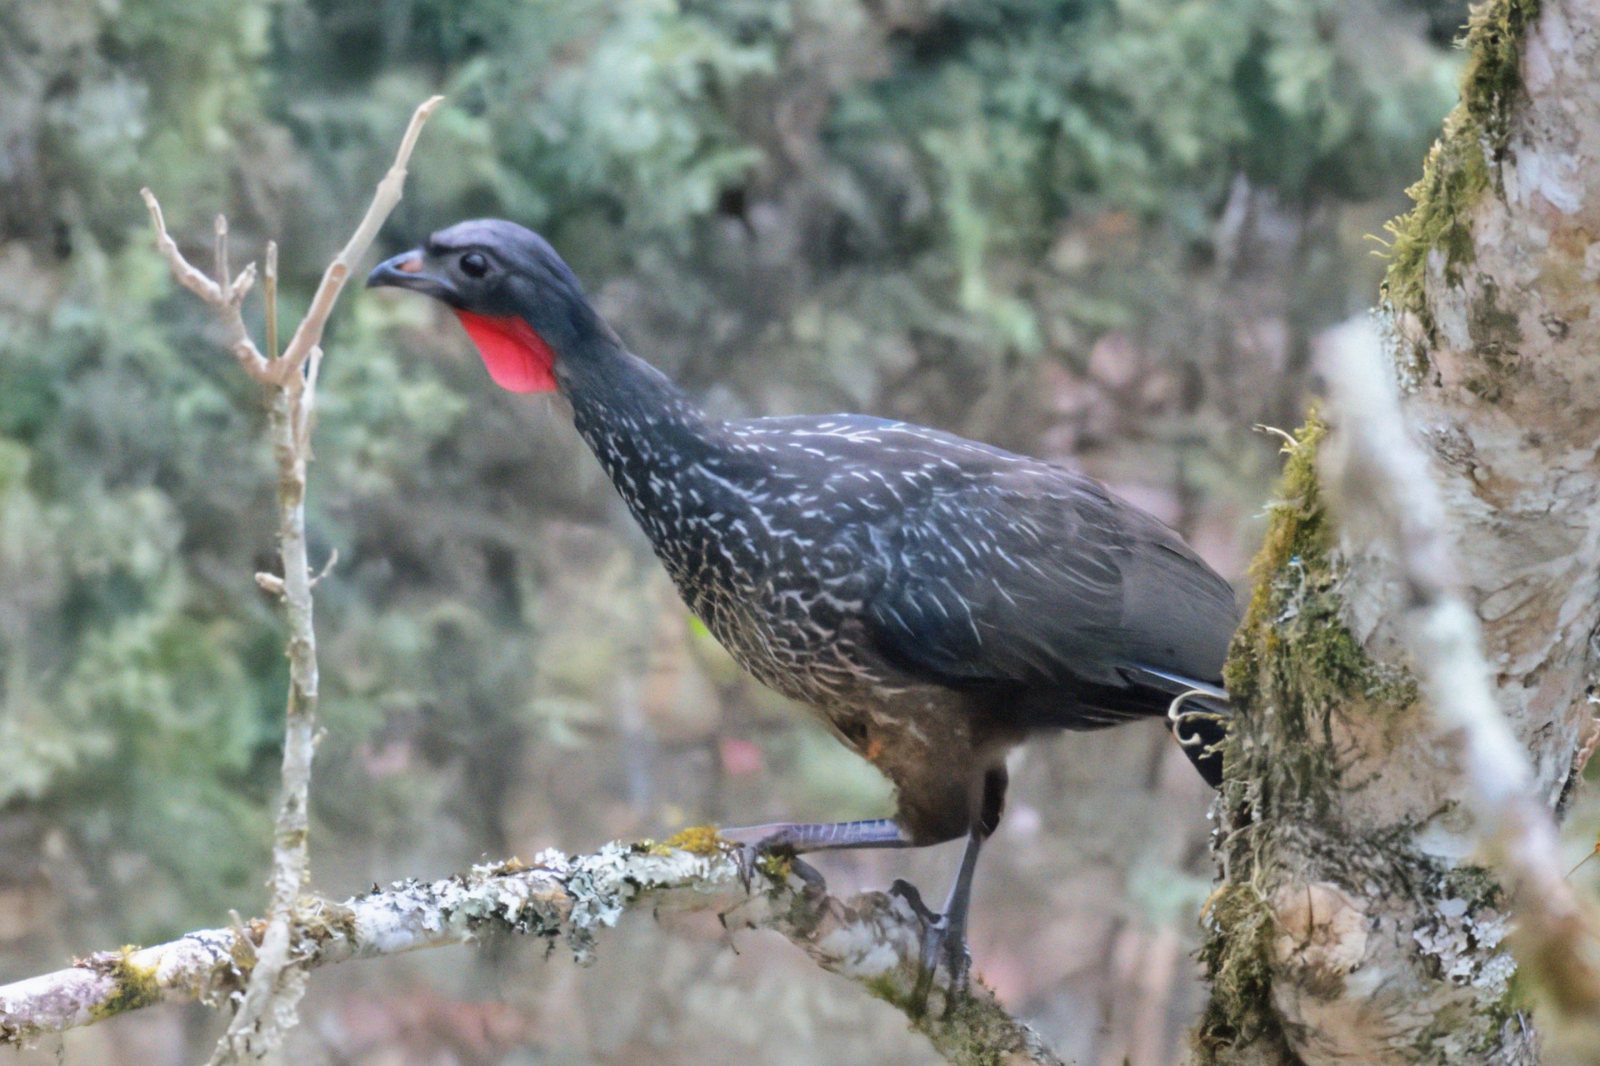
The AI Denoise slider takes the other road. It runs a neural network that was trained on enormous numbers of noisy-and-clean photo pairs, so it has learned what feathers, fur, and eyes actually look like. Instead of averaging the grain away, it recognizes the real texture underneath and reconstructs it. On a test frame so noisy that classic methods left it a mess of rainbow speckle, AI Denoise returned a clean bird with its feather pattern fully revealed.
- It's a slider, not a switch — 0 means off; higher means stronger. Use it on any high-ISO shot.
- Bird mode leans in harder — feathers and fur benefit most, so the bird toggle adds extra strength automatically.
- It fails safe — if the AI model isn't installed or the graphics card runs out of memory, the app quietly falls back to classic noise reduction - your photos always get SOMETHING.
Building a Topaz-class denoiser from scratch would take years and millions of training images. Instead the app uses SCUNet, a state-of-the-art open research model - properly credited, locally run, nothing uploaded. The engineering work was making it PRACTICAL: tiling huge 45-megapixel frames through it without seams, running on the graphics card when present, and degrading gracefully when it isn't.
Why not make it always-on? Time. It costs ~10 seconds per photo even on a fast GPU. Grain cleanup at that quality is worth 10 seconds for a dusk wildlife shoot and a waste of an hour for 400 sunny keepers - so it's the user's call, per batch.
SCUNet (Swin-Conv U-Net, ~69 MB weights, blind real-noise model) via PyTorch, CUDA when available. Full-res frames are processed in 1024-px tiles with 128-px overlap and a strictly positive linear feather, accumulated and renormalized - no visible seams. The strength slider blends the AI output with the input. The wrapper never throws: missing weights, missing torch, or an OOM mid-tile all return the input unchanged, and the caller detects that and falls back to the classical path. Planned for the packaged beta: ONNX + DirectML so any Windows GPU accelerates it without bundling CUDA torch.
The rescue, in pictures
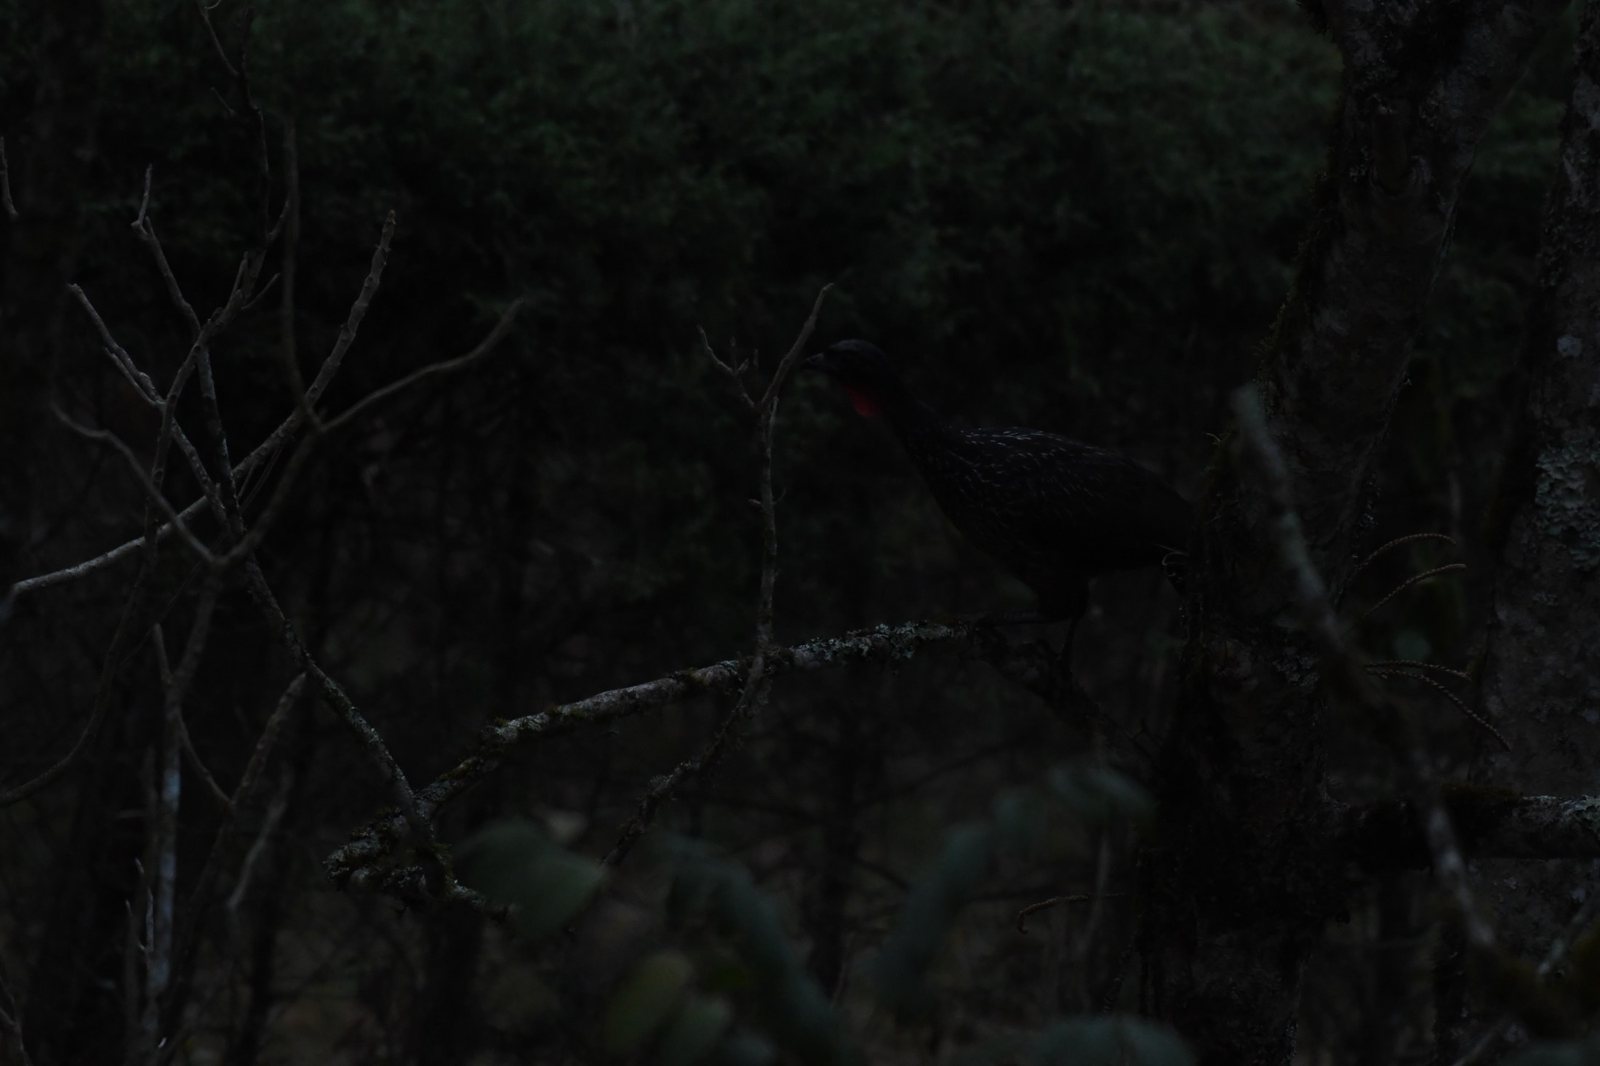
The next page is the frame that settled the argument, whole journey on one page. Shot at ISO 4000 in deep forest shade and underexposed, the original is a wall of colored grain - classic noise reduction could not touch it. Step 2 shows that the app still found the bird in the dark (the view is brightened there so you can see the boxes). Step 3 is the same frame after Bird mode with AI Denoise.
9 · The camera-back screen
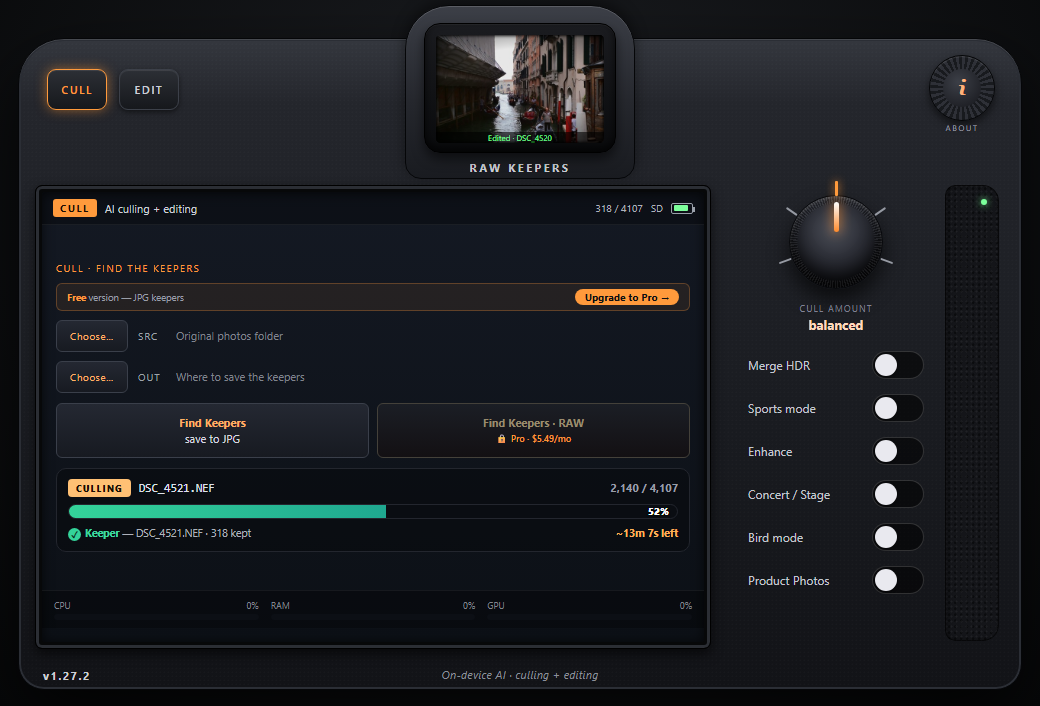
The interface is deliberately styled like the back of a camera — one screen, one skin, physical-feeling toggles. Photographers already know how to read a camera back; nothing needs explaining. Here it is mid-cull, exactly as you'd see it:
A progress bar that kills the waiting anxiety
Long batches used to mean a thin bar and a prayer. The progress display was redesigned around one goal: you should never wonder what's happening or how long is left. It shows the stage (Culling / Editing / HDR / AI Denoise), the exact photo being worked on, the count, the percentage, and a live time-remaining estimate. And when the cull decides a photo is a keeper, the bar flashes green and tells you — “✓ Keeper — DSC_4521 · 318 kept” — so a 10-minute cull becomes strangely fun to watch.

The eyepiece
Up top, the little viewfinder shows the photo being processed: first the original, then — the moment it's done — the edited result, which holds on screen at least two seconds before the next photo takes over. It's a live before/after ticker. The thumbnails are tiny on purpose (a few kilobytes each), so the show costs the batch nothing. A soft vignette darkens the corners, like real eyepiece glass.
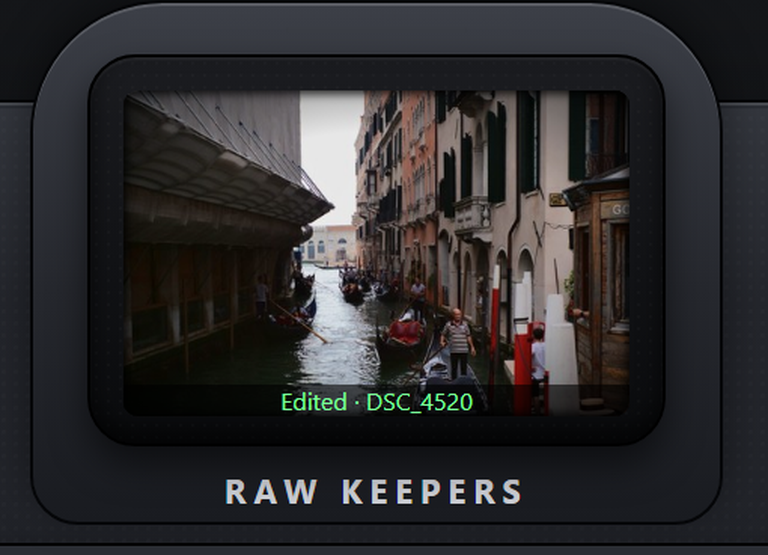
Processing never waits for the display: preview events carry 220-px data-URL thumbnails, and a client-side governor enforces the 2-second hold - events arriving during a hold are deferred with newest-wins, so the queue can't grow. Cull progress streams from the analysis threads throttled to ~200 updates per run, but keeper events always push through.
10 · Built-in safety and honesty
- Originals are never touched — every operation reads your RAWs and writes NEW files elsewhere. There is no code path that modifies a source file.
- Full-disk protection — before a run starts, the app estimates the space needed and refuses to start if the destination drive can't hold it.
- Honest failure — if a run fails, the bar turns red and says Failed - it will never dress an error up as a green “Finished.” A cancelled run says Stopped.
- One bad file can't sink the batch — every photo is processed in isolation; a corrupt frame is skipped and logged while the other 2,999 continue.
- No silent wrong answers — if the bird model were missing, the app raises an error rather than silently rejecting every photo as “out of focus.”
These aren't features you'll notice day to day — which is the point. They're the difference between software that demos well and software you trust with a wedding.
11 · Speaking every camera's RAW language
RAW files are each maker's private dialect. RAW Keepers reads Nikon NEF, Canon CR2/CR3, Sony ARW, Fujifilm RAF, Olympus ORF, Panasonic RW2, DNG and more — with nothing extra to install, because a complete RAW decoder ships inside the app.
The alternative - requiring Adobe's free DNG Converter - was the original design, and it was dropped for the public beta: asking a first-time user to install a second program before seeing their first result is where most trials die. The bundled decoder (LibRaw) covers virtually everything; Adobe's converter is used only if it happens to be present, for the one exotic case (Nikon Z8/Z9 “High Efficiency” files) the open decoder can't read.
12 · How it all gets tested
Every method in this manual earned its place by surviving real photos — not samples, but actual shoots: weddings, travel, a 4,107-frame bird day, ISO-4000 dusk sets, concert stages.
- Before/after reviews — an edit ships only when the “after” clearly beats the “before.” When a reviewer said the HDR looked flat or the eyes went dark, the recipe changed.
- Expert panels — sets of specialist reviewers (portrait, lighting, wildlife, architecture, sports) audit the keepers and edits and argue it out; their consensus drives algorithm changes.
- Validation against the photographer — the bird cull was approved only after its designer reviewed every single culled frame from a real shoot and found nothing he'd have kept.
- A full program review — before this manual was written, four independent code reviewers audited the entire program; all 26 findings - from a race condition to a 1-pixel border - were fixed and re-verified with 35 automated checks.
13 · A few numbers tech people will enjoy
| What | Measured |
|---|---|
| Frames scanned in the bird-mode validation shoot | 4,107 Nikon D500 NEFs |
| Frames the focus-cull removed (all verified misses) | 379 - zero wanted keepers lost |
| Bird keepers then AI-denoised, full + cropped versions | 870 each (2.9 hours, GPU) |
| AI Denoise speed on a 20-megapixel frame | ~10.5 seconds (CUDA GPU) |
| SCUNet model size bundled with the app | 69 MB |
| Bird detection cost per frame | 5 inferences (full frame + 2×2 tiles) |
| Progress thumbnails sent to the eyepiece | 220 px, ~15 KB, throttled to ~200 pushes/run |
| Camera tilt the gyro caught that pixel analysis missed | 9.2° |
| Sharpening cutoff (don't sharpen grain) | ISO 800 |
| Findings in the full-program review, all fixed | 3 critical · 8 moderate · ~15 minor |
| Sports-crop batch validation (whole game card) | 61 frames · 0 errors · 0 subjects cut |
14 · Plain-English glossary
RAW — the unprocessed file your camera saves - all the sensor data, before any look is applied. Bigger and more flexible than a JPEG.
Cull — the first pass through a shoot: throwing out misses and picking the best frame of each moment.
Keeper — a photo that survives the cull.
Bracket / AEB — several shots of the same scene at different brightnesses, taken to be merged later (Auto Exposure Bracketing).
HDR — High Dynamic Range - merging a bracket so both the dark and bright parts of a scene look right at once.
Ghosting — the double-image smear you get when something moved between merged frames.
ISO — the camera's light sensitivity setting. Higher ISO = shooting in less light = more grain.
Grain / noise — the gritty speckle in low-light photos.
Catchlight — the tiny sparkle of reflected light in an eye. Lose it and the subject looks lifeless.
White balance — the correction that makes whites white - removing the orange of indoor bulbs or the blue of shade.
Demosaic — the math that turns raw sensor data into a viewable color image.
Neural network — software trained on millions of examples until it recognizes patterns - here, what real feathers look like versus noise.
GPU — the graphics card; a math machine that runs the AI parts many times faster than the main processor.
EXIF / metadata — invisible notes the camera writes into each file: settings, time, lens - and the tilt sensor reading.
Rule of thirds — a composition guideline: subjects placed a third of the way into the frame usually look stronger than dead center.
RAW Keepers · rawkeepers.com · Your photos never leave your PC.